Add Additional Certificate Authority for Node JS
I have received this error when trying to connect Humly Control Panel to Exchange Server or when trying to connect Humly Controle Panel to the booking system through a proxy server. What shall I do?
"UNABLE_TO_VERIFY_LEAF_SIGNATURE" or "UNABLE_TO_VERIFY_FIRST_CERTIFICATE"
In some installations, the exchange server/proxy uses a certificate issued by the local CA, to allow Node to trust this certificate authority, the CA has to be added to the (Trusted Root Certification Authorities) container.
Solution On Windows
The solution is to add "NODE_EXTRA_CA_CERTS" Windows system variable with the path to Root CA certificate (or a chain with Intermediate CA) in PEM (Base64 / CRT ) format.
Option one:
- Prepare/Export the CA certificate of the exchange server or the proxy server as Base64/CRT format and place a copy on Humly Control Panel server.
- Open CMD as an administrator
- Use this command to add the certificate, change the path to the place where you have placed the certificate file
setx NODE_EXTRA_CA_CERTS "C:\Path\To\CA_Root_Cert.crt" -m
- Reboot the server and start Humly Control Panel Wizard again.
Option two:
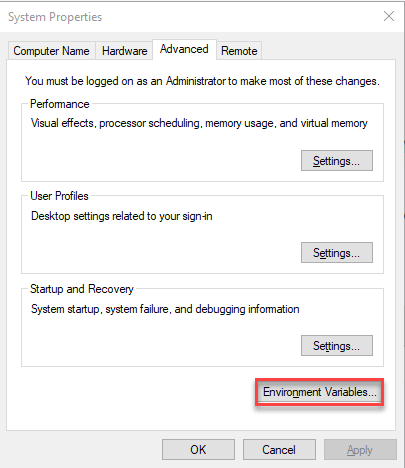
- Open Windows Environment Variables

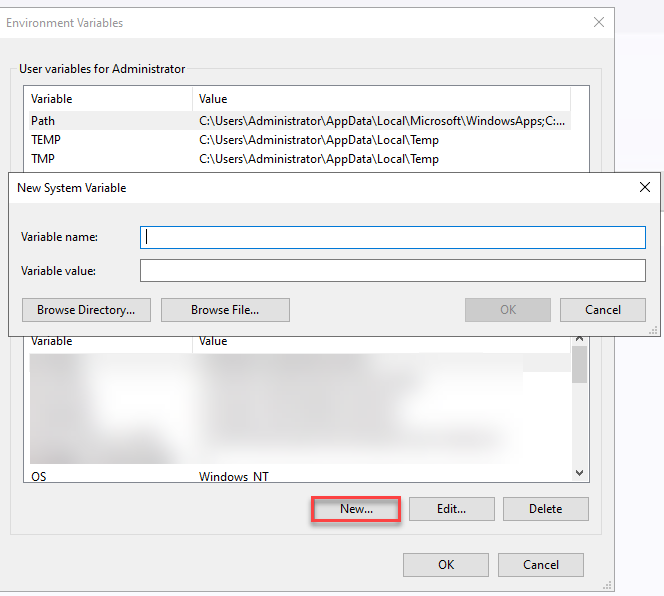
- Add new variable

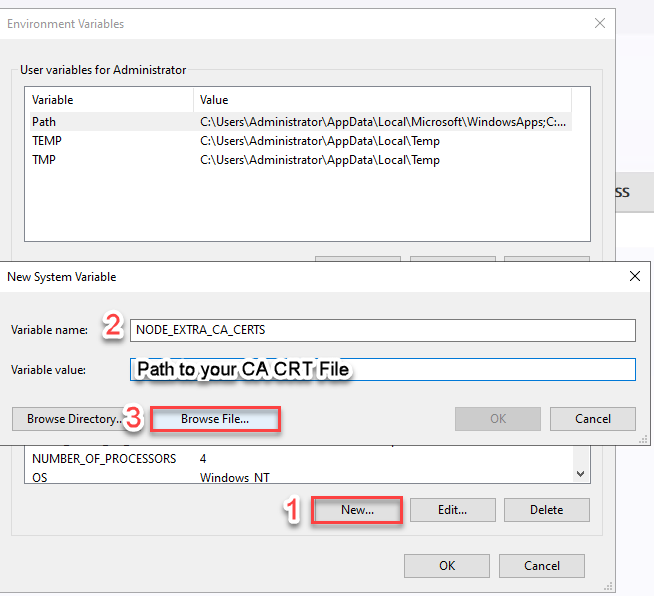
- Add the following variable name "NODE_EXTRA_CA_CERTS", click on browse file and select the CA CRT file

- Reboot the server and start Humly Control Panel Wizard again.
Please follow the steps mentioned in the Ubuntu documentation link here
Installing a root CA certificate in the trust store
To export the Root Certificate Authority (CA) from a working certificate in a browser, you can follow these general steps depending on your browser:
For Google Chrome:
-
Open the Certificate Viewer:
- Navigate to the site that uses the certificate in question.
- Click the padlock icon in the address bar.
- Click on "Connection is secure" (or a similar option depending on the Chrome version).
- Click on "Certificate is valid."
-
View the Certificate Chain:
- In the Certificate window, go to the "Certification Path" tab.
- Here, you'll see a hierarchy of certificates. The top one is usually the Root CA, in this case, you are looking for the "Basel" root CA.
-
Export the Root CA:
- Select the top-level certificate (Root CA).
- Click "View Certificate."
- In the new window, go to the "Details" tab.
- Click "Copy to File…" to start the Certificate Export Wizard.
- Choose the format (usually DER or Base-64 encoded X.509).
- Save the file to your desired location.
For Microsoft Edge:
-
Open the Certificate Viewer:
- Similar to Chrome, click on the padlock icon in the address bar.
- Click on "Connection is secure" or "Certificate (valid)."
-
View the Certificate Chain:
- In the Certificate window, go to the "Certification Path" tab.
- Select the Root CA (look for "Basel").
-
Export the Root CA:
- Click "View Certificate."
- Go to the "Details" tab.
- Click "Copy to File…" and save the certificate.