Standalone SMTP Setup - Microsoft 365 (OAuth 2.0)
This Feature is available on Humly Control Panel v 2.4 and above
This article covers the process of preparing Microsoft 365 for SMTP email sending from Humly Control Panel using OAuth 2.0. During the process you will configure the following:
- Register an application in Azure AD
- Add API permissions
- Create a client secret
- Configure Standalone SMTP Credentials in HCP
- Generate and run the Exchange Online PowerShell script
Note: Microsoft is deprecating Basic Authentication for Exchange Online SMTP. By end of 2026, Basic Auth will be disabled by default for existing tenants. This guide covers the required OAuth 2.0 replacement using the Client Credentials flow.
Exchange Online SMTP AUTH Basic Authentication Deprecation Timeline
Table of Contents
- Common Use Cases
- Register an Application in MS Entra
- Configure Standalone SMTP Credentials in HCP
- Run the Exchange Online PowerShell Script
- Best Practices
- Troubleshooting
Common Use Cases
- Setting up Standalone SMTP email sending in HCP for the first time with a Microsoft 365 tenant.
- Migrating an existing Basic Authentication SMTP setup to OAuth 2.0 before the Microsoft deprecation deadline.
- Updating a client secret that has expired or been revoked.
Register an Application in MS Entra
These steps are performed by the customer's Entra administrator in the MS Entra.
Create the app registration
- Navigate to Microsoft Entra ID > App registrations and click New registration.
- Fill in the following fields:
- Name: A descriptive name, for example Humly SMTP Relay
- Supported account types: Accounts in this organizational directory only (Single tenant)
- Redirect URI: Leave blank
- Click Register.
- On the Overview page of the newly created app registration, note down the following values — they will be needed when configuring HCP:
- Application (client) ID
- Directory (tenant) ID
Add API permissions
- In the app registration, go to API permissions > Add a permission.
- Select APIs my organization uses and search for Office 365 Exchange Online.
- Select Application permissions, then add the permission SMTP.SendAsApp.
- Click Add permissions.
- Click Grant admin consent for [organization name] and confirm.
Important: Admin consent is required for Application permissions. Without it, the app will not be able to request access tokens.
Create a client secret
- Go to Certificates & secrets > Client secrets and click New client secret.
- Enter a description (for example HCP SMTP) and select an expiry period, then click Add.
- Copy the Value of the newly created secret immediately.
Important: The client secret value is only visible immediately after creation. If you navigate away before copying it, you will need to delete the secret and create a new one.
Note the Enterprise Application Object ID
- Navigate to Microsoft Entra ID > Enterprise applications.
- Search for the application name created in step 1 and open it.
- On the Overview page, copy the Object ID.
Tip: This is not the same as the Application (client) ID from step 4. The Object ID from Enterprise applications is required for the PowerShell script in a later step.
Configure Standalone SMTP Credentials in HCP
- Open the HCP setup wizard and navigate to the Standalone SMTP Credentials step.
- Enter the sender mailbox address in the Standalone Admin email field (for example noreply@company.com). This is the mailbox HCP will send email from.
- In the Authentication dropdown, select Microsoft 365 (OAuth 2.0). The SMTP Server field will automatically populate with smtp.office365.com, TLS Options will be set to STARTTLS, and SMTP Port will be set to 587.
- Fill in the remaining fields using the values collected during the Azure AD setup:
Field Value Tenant ID Directory (tenant) ID step 4 Application Client ID Application (client) ID step 4 Client Secret Secret value step 3 Enterprise App Object ID Object ID step 3 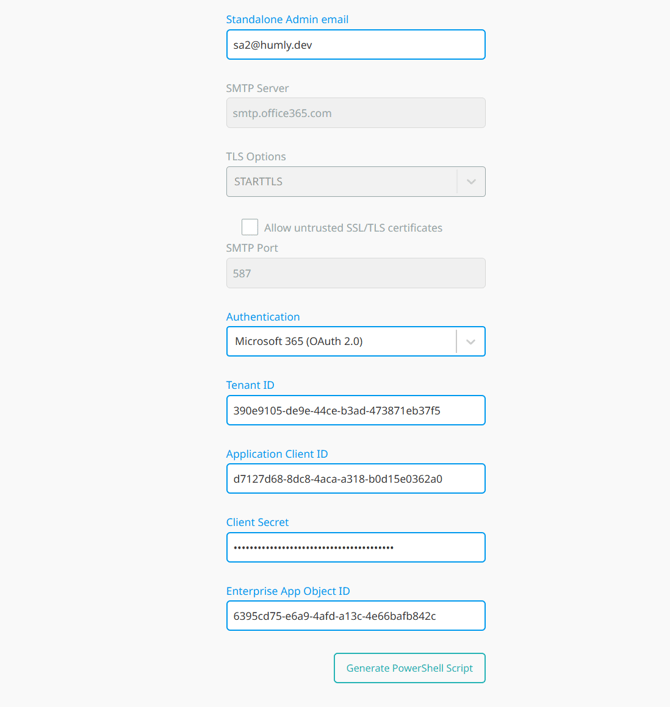
- Click Generate PowerShell Script. The Exchange Online Setup dialog will appear with the script required for the next section.
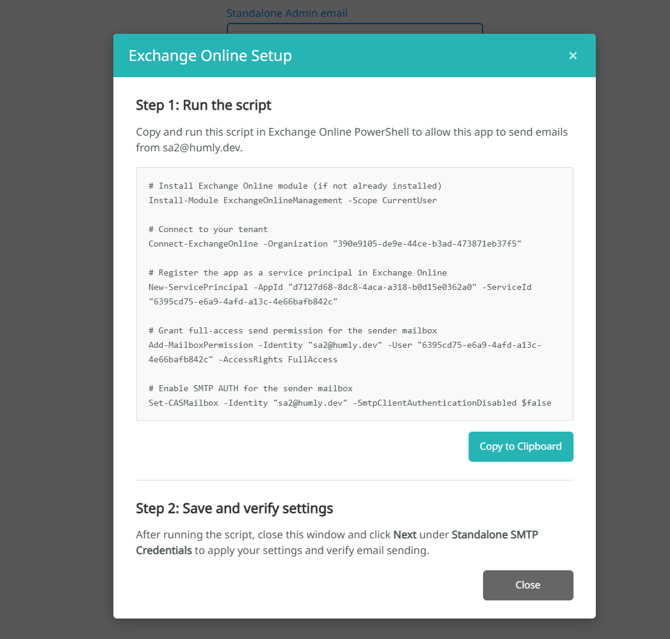
Run the Exchange Online PowerShell Script
Before clicking Next in HCP, the generated PowerShell script must be run by the customer's Exchange administrator.
What the script does
The script performs the following actions in Exchange Online:
- Installs the ExchangeOnlineManagement PowerShell module if not already present
- Connects to the customer's Exchange Online tenant
- Registers the Azure AD application as a service principal in Exchange Online
- Grants the service principal FullAccess permission on the sender mailbox
- Enables SMTP AUTH for the sender mailbox
Running the script
- In the Exchange Online Setup dialog in HCP, click Copy to Clipboard.
- Open a PowerShell session and paste the script.
- The script will prompt for credentials when connecting to Exchange Online. Sign in with a Global Administrator or Exchange Administrator account.
- Verify that all commands complete without errors.
- Return to HCP, close the Exchange Online Setup dialog, and click Next.
- HCP will authenticate with Exchange Online using the OAuth 2.0 credentials and send a test email to the Standalone Admin email address entered in the wizard.
- Confirm that the test email is received. If successful, the wizard will proceed to the next step.
Note: If you do not have the ExchangeOnlineManagement module installed, the first line of the script (Install-Module ExchangeOnlineManagement -Scope CurrentUser) will install it. This requires internet access and may prompt for confirmation.
Best Practices
- Use a dedicated sender mailbox. Avoid using a personal or admin account as the sender mailbox. A dedicated mailbox such as noreply@company.com is easier to manage and reduces risk if the account changes.
- Set an appropriate expiry for the client secret. Choose an expiry period that aligns with your organisation's security policy. Make a note of the expiry date and plan for renewal before it lapses to avoid email sending failures.
- Store the client secret securely. The client secret grants access to send email on behalf of the sender mailbox. Store it in a secure location and restrict access accordingly.
- Run the PowerShell script before clicking Next in HCP. The Exchange Online service principal and mailbox permissions must be in place before HCP attempts to verify the connection. Running the script after clicking Next will result in a failed verification.
- Grant admin consent before saving. Ensure admin consent has been granted for the SMTP.SendAsApp permission in Azure AD before attempting to verify the connection in HCP. Without consent, token requests will fail.
Troubleshooting
Authentication fails when verifying the connection in HCP
- Confirm that admin consent has been granted for the SMTP.SendAsApp permission in Azure AD. Go to App registrations > API permissions and verify the status shows Granted.
- Verify that the Tenant ID, Application Client ID, Client Secret and Enterprise App Object ID have been entered correctly in HCP.
- Check that the client secret has not expired. If it has, create a new secret in Azure AD and update HCP.
535 5.7.3 Authentication unsuccessful
- Confirm that the Set-CASMailbox command in the PowerShell script completed without errors. SMTP AUTH must be explicitly enabled on the sender mailbox.
- Verify that SmtpClientAuthenticationDisabled is set to
$falsefor the mailbox by running the following in Exchange Online PowerShell:
Get-CASMailbox -Identity "sender@company.com" | Select SmtpClientAuthenticationDisabledService principal not found or New-ServicePrincipal fails
- Verify that the Enterprise App Object ID entered in HCP matches the Object ID from Enterprise applications in Azure AD, not the App registrations page.
- Confirm that the application has been consented to in the tenant. If admin consent was not granted, the enterprise application may not have been created. Grant admin consent and retry.
The client secret has expired
- Go to Azure AD > App registrations, select the app, navigate to Certificates & secrets and create a new client secret.
- Update the Client Secret field in HCP under Global Settings > Standalone SMTP Credentials.