Introduction
Touchless Check-in was introduced on the Humly Room Displays as of version 1.7 in October of 2021. Release notes 1.7.
With Touchless Check-in the user will be able to check-in to a meeting on the Humly Room Display without touching the display. The Touchless Check-in feature will be available on the main screen 10 min before the meeting is about to start and will be represented by a symbol of hand holding a RFID card. So, during the Check-in period the user only need to swipe their RFID card or tag across to the symbol, and the meeting will be checked-in.

If users within your organization will be using RFID cards or tags to authenticate themselves with the Humly Room Display when checking-in, you first need to make sure that you have enabled the use of PIN or RFID in Global Settings. Then, you will also need to enable Touchless Check-in in Default Room Settings( if you want all imported rooms onward to have this feature enabled) and/or Room Settings( if you want individual rooms or rooms within a specific structure to have this feature.
Global Settings
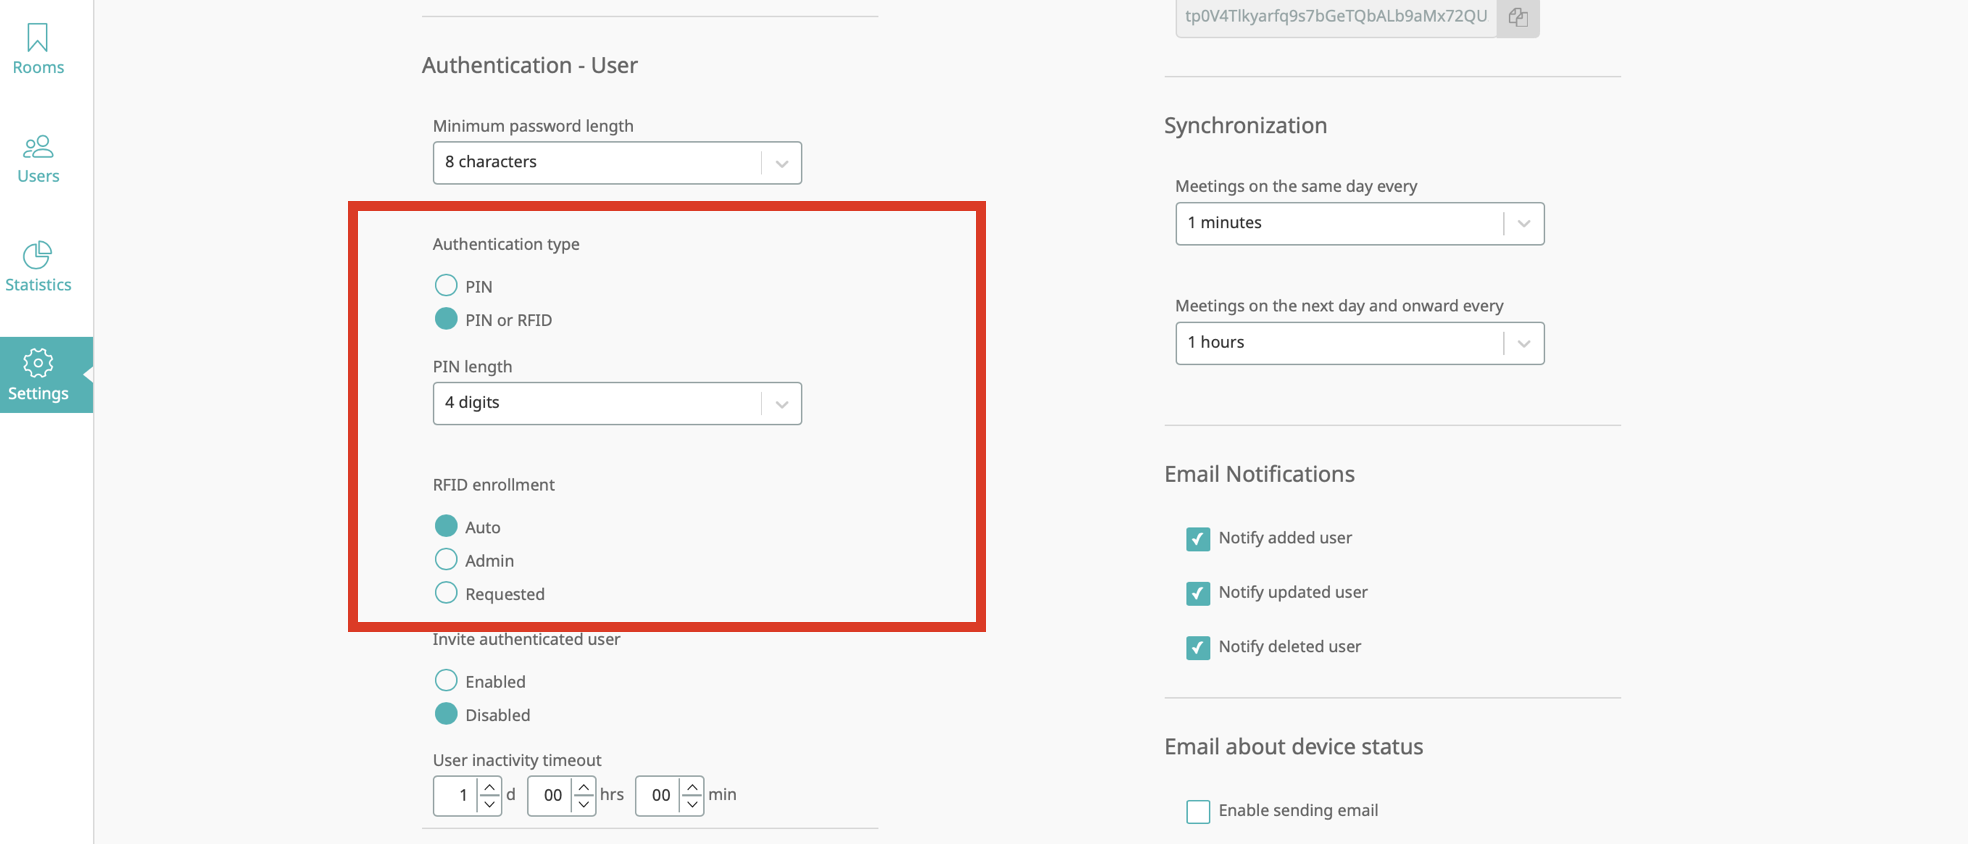
- Log in to Humly Control Panel as Global Admin and go to Settings>,Global Settings
- Enable PIN or RFID and select RFID enrollment to be either Auto, Admin or Requested
Auto: allow users to associate a new RFID tag with their user account by scanning their RFID tag on a HRD device and then identifying themselves with their PIN.
Admin: allow HCP administrator to add RFID to a user in HCP by editing the user under the users page.
Requested: is basically the same as Auto. The difference being that after the RFID data is enrolled via the HRD, the user can not use the RFID until the administrator approves it from HCP. - Click Save button to save your Global Settings
Next, you will have to enable the Touchless Check-in feature in Default Room Settings(if you want all imported rooms onward to have this feature enabled) and/or in Room Settings( if you want already imported rooms to have this feature enabled)
Default Room Settings
- Log in to Humly Control Panel as Global Admin and go to Settings>,Default Room Settings
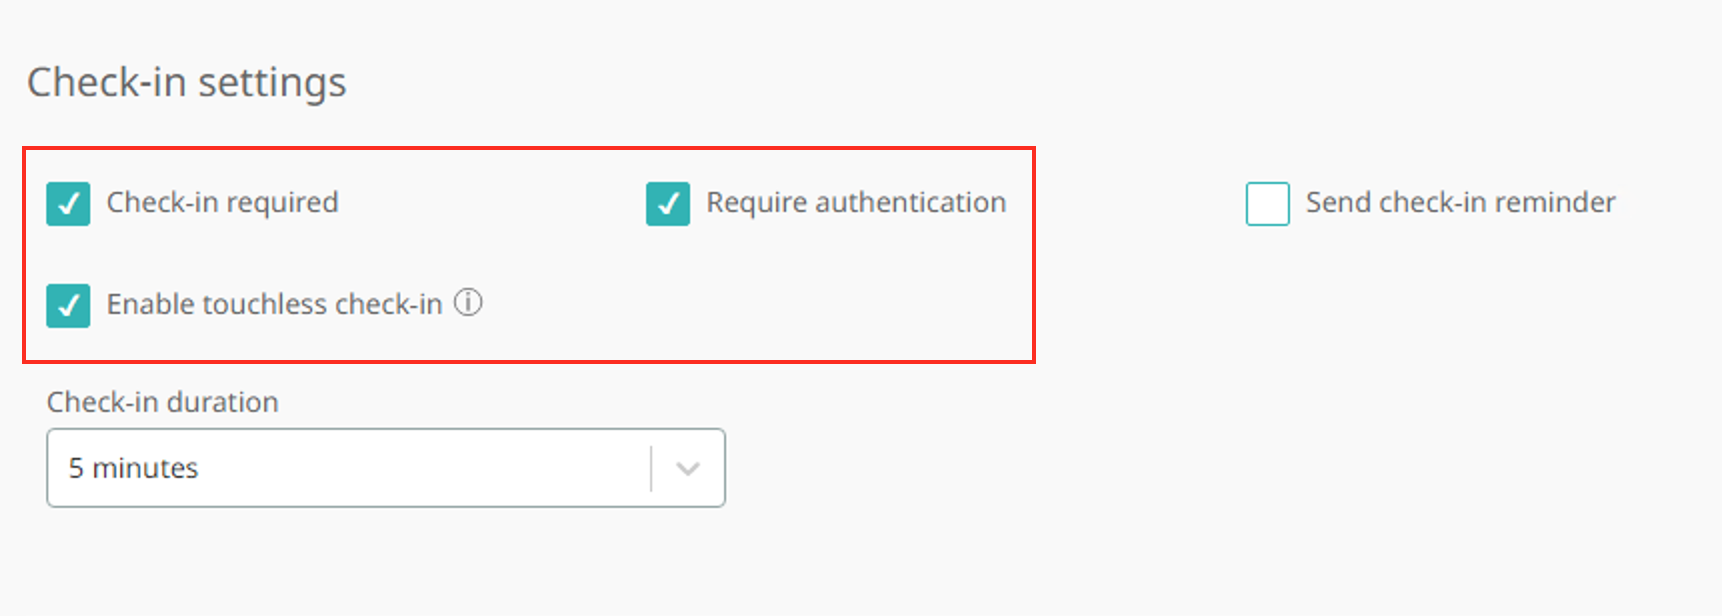
- Under Check-in settings make sure that Check-in required and Require authentication is enabled, along with Enable touchless check-in
- Click Save button to save your Default Room Settings
Room Settings
Editing Room Settings for a country, city, building, floor or 2 or more individual rooms and clicking Save button, will change all room settings for those rooms and not only the setting you have changed. Therefore we recommend you to change settings for rooms individually if you have a setup where structures or rooms have different room settings.
- Log in to Humly Control Panel as Global Admin and go to Rooms>,Room Settings
- Choose whether you want to edit room settings for all rooms in a specific country, city, building or floor, or if you want edit room settings for individual rooms
- In the edit window for the specific structure or individual room(s), scroll down to Check-in settings and enable Check-in required and Require authentication, along with Enable touchless check-in
- Click Save button to save the Room Settings
Touchless Check-in (without authentication)
If users within your organization will not be using RFID cards or tags to authenticate themselves with the Humly Room Display when checking-in, it's not required to have PIN or RFID enabled in Global Settings. But you still need to enable Touchless Check-in in Default Room Settings( if you want all imported rooms onward to have this feature enabled) and/or Room Settings( if you want already imported rooms or rooms within a specific structure to have this feature), in case you want ANY* tag or RFID card to be able to work
Global Settings
- Log in to Humly Control Panel as Global Admin and go to Settings>,Global Settings
- Choose to enable either PIN or PIN or RFID (if you select PIN or RFID you also need to and select RFID enrollment method to be either Auto, Admin or Requested
Auto: allow users to associate a new RFID tag with their user account by scanning their RFID tag on a HRD device and then identifying themselves with their PIN.
Admin: allow HCP administrator to add RFID to a user in HCP by editing the user under the users page.
Requested: is basically the same as Auto. The difference being that after the RFID data is enrolled via the HRD, the user can not use the RFID until the administrator approves it from HCP.

- Click Save button to save Global Settings
Next, you will have to enable the Touchless Check-in feature in Default Room Settings(if you want all imported rooms onward to have this feature enabled) and/or in Room Settings( if you want already imported rooms to have this feature enabled)
Default Room Settings
- Log in to Humly Control Panel as Global Admin and go to Settings>,Default Room Settings
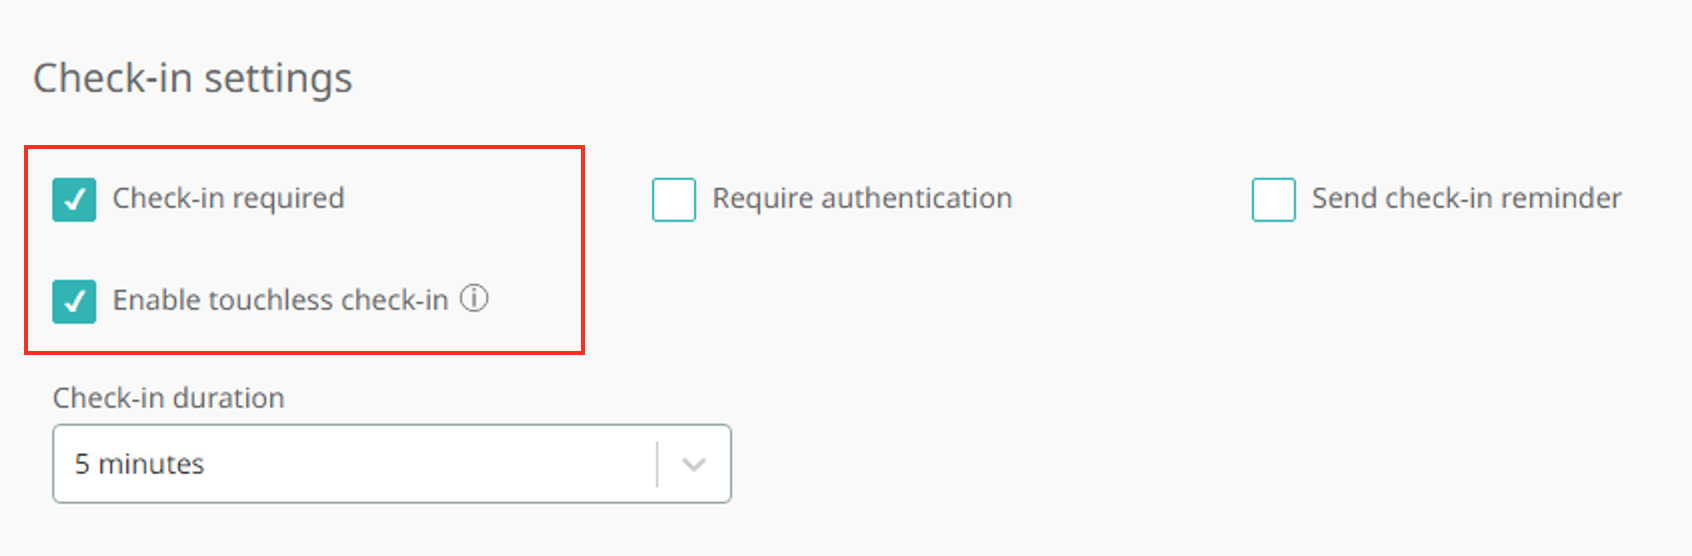
- Under Check-in settings make sure that Check-in required along with Enable touchless check-in
- Click Save button to save your Default Room Settings
Room Settings
Editing Room Settings for a country, city, building, floor or 2 or more individual rooms and clicking Save button, will change all room settings for those rooms and not only the setting you have changed. Therefore we recommend you to change settings for rooms individually if you have a setup where structures or rooms have different room settings.
- Log in to Humly Control Panel as Global Admin and go to Rooms>,Room Settings
- Choose whether you want to edit room settings for all rooms in a specific country, city, building or floor, or if you want edit room settings for individual rooms
- In the edit window for the specific structure or individual room(s), scroll down to Check-in settings and enable Check-in required along with Enable touchless check-in
- Click Save button to save the Room Settings