Introduction
Humly Floor Plan allows you to visualize your workspace in real-time and manage room, desk, and parking space bookings through an interactive 3D floor plan interface.

Two Ways to Access Humly Floor Plan
Humly Floor Plan can be accessed in two different ways, depending on how your organization has configured it:
1. Within Humly Reservations (This Guide)
Most users access the floor plan from within Humly Control Panel:
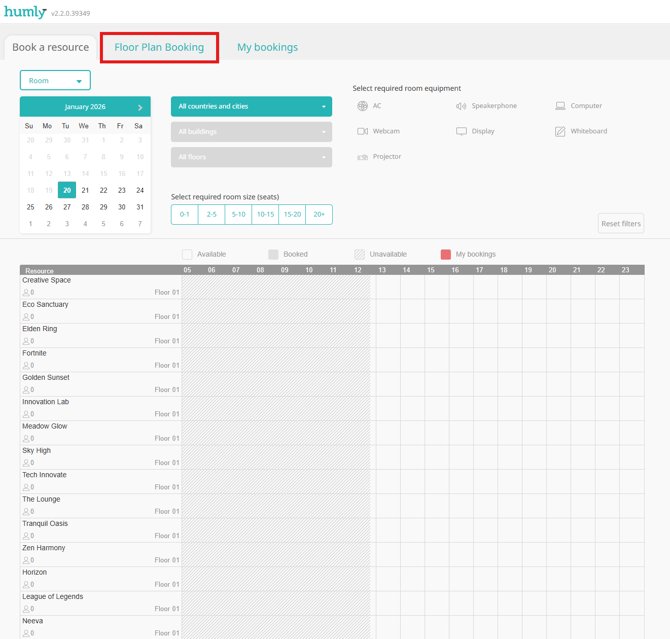
- Navigate to Floor Plan Booking in the Reservations menu
- Browse multiple locations, buildings, and floors
- Full authentication using your HCP login credentials
- Integrated with all Humly Workspace Solutions features
This user guide covers how to use Floor Plan within Humly Reservations.
2. Standalone Floor Plan Screen (Kiosk Mode)
Your organization may also deploy standalone floor plan screens for:
- Lobby kiosks and self-service booking stations
- Room and desk booking station
- Wayfinding displays
Standalone screens can operate in two modes:
- Static (View-only): Display availability without booking capabilities
- Interactive (Bookable): Allow bookings using PIN authentication or anonymous, based on the resource settings
For instructions on using standalone floor plan kiosks, see the Humly Floor Plan - Interactive Booking
What This Guide Covers
This user guide will cover how to:
- Login to Humly Floor Plan
- Book a Room from the Floor Plan
- Book a Desk from the Floor Plan
- Book a Parking Space from the Floor Plan
- Search for Resources and Colleagues
- Use Floor Plan with Microsoft Teams
Login to Humly Floor Plan
When you log in to the Humly Control Panel, you have access to Humly Floor Plan.
-
Log in to the Humly Control Panel with your username and password, or using SSO. Depending on your user type (Global Admin, Local Admin, Statistics User, or User), Humly Control Panel will grant you access to different features.
-
Go to Floor Plan Booking from the navigation menu
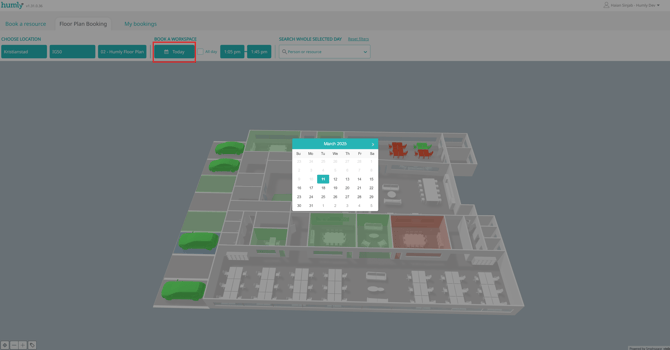
- Depending on how many Floor Plans are configured in the system, the map might load directly. If more than one floor plan is configured, start by selecting the structure where the Floor Plan is located.
-
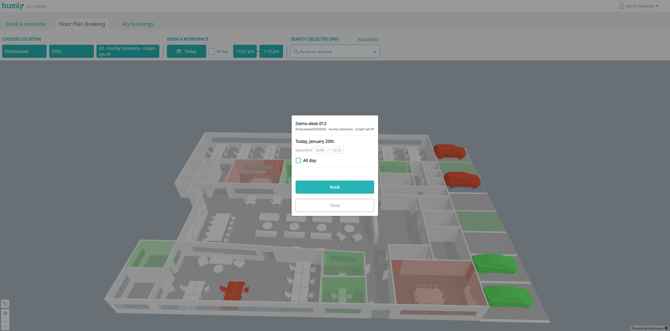
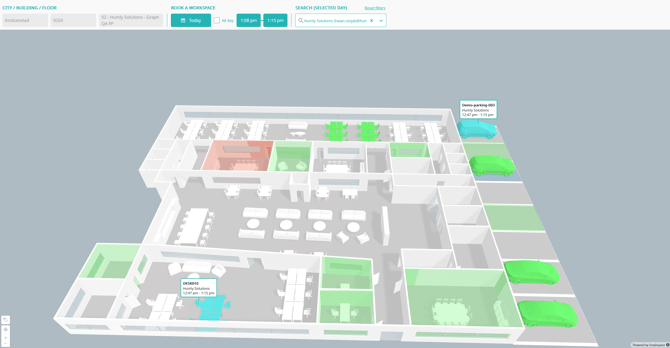
Use the calendar and location filters to find available rooms, desks, or parking spaces.
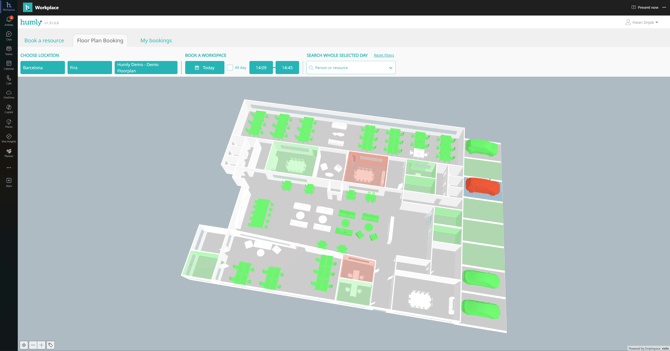
Book a Resource
The interface of Humly Floor Plan is designed to be consistent with other products in Humly Workspace Solutions for a coherent user experience.
Understanding Resource Availability
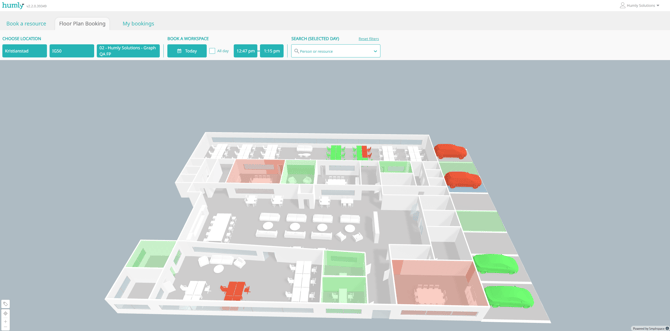
Resources are color-coded to indicate availability:
- Green - Available
- Red - Occupied/Booked
Booking Procedure
-
Choose which day and date you want to book a resource using the calendar filter
-
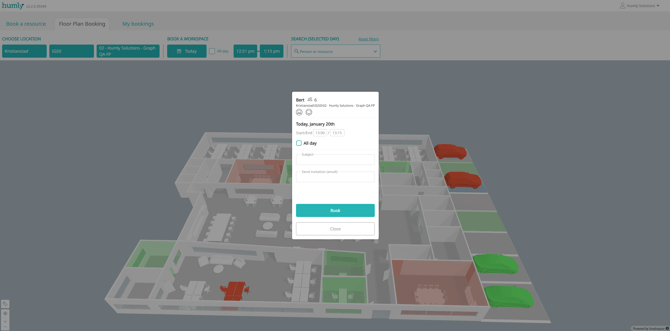
Click on an available resource (shown in green) on the floor plan
-
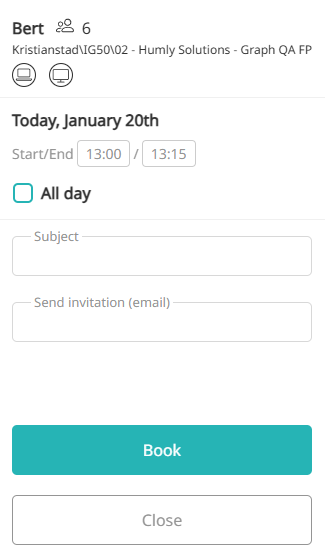
The booking dialog will appear with the following information (from top to bottom):
- Resource name and structure location
- Equipment available in the resource (Rooms only)
- Start and end time of the booking
- Booking subject (Rooms only)
- Invitation email (Rooms only)
- Cancel and Book buttons
-
Adjust the start and end time for your booking
-
Set a subject for your booking (rooms only)
-
(Optional) Add invitation emails:
- Fill in the email field and press Enter
- You can add multiple email addresses
- Invitations will be sent when the booking is confirmed
-
Click Book to confirm the booking
The booking will be synced to:
- The room's Humly devices (if applicable)
- The resource calendar in your booking system (e.g., Microsoft 365, Exchange, Google Calendar)
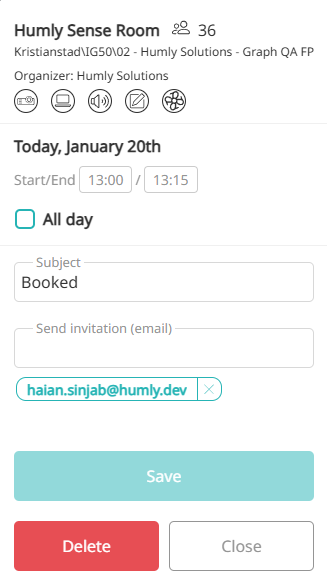
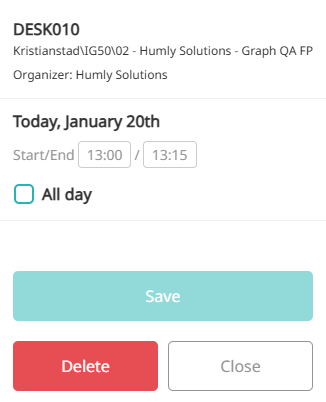
Deleting and Editing a Room Booking
If you want to delete one of your bookings:
- Click on the red/booked room on the floor plan
- The booking dialog will appear, showing your booking details
- Click the Delete button to cancel the booking, or edit the meeting details and click the Save button.
Book a Desk
Booking a desk is similar to booking a room when it comes to selecting the date and structure, but it has a slightly different booking dialog.
Creating a Desk Booking
- Use the calendar to select your desired date
- Use the location filter to navigate to the correct building/floor
- Click on an available desk (shown in green)
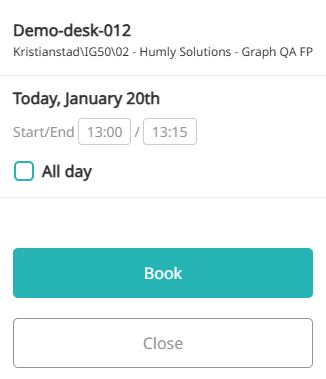
- The desk booking dialog appears with:
- Desk name and location
- Start and end time
- Book and Cancel buttons
- Adjust the time as needed
- Click Book to confirm
Deleting and Editing a Desk Booking
If you want to delete one of your bookings:
- Click on the red/booked desk on the floor plan
- The booking dialog will appear showing your booking details
- Click the Delete button to cancel the booking, or edit the meeting details and click the Save button.
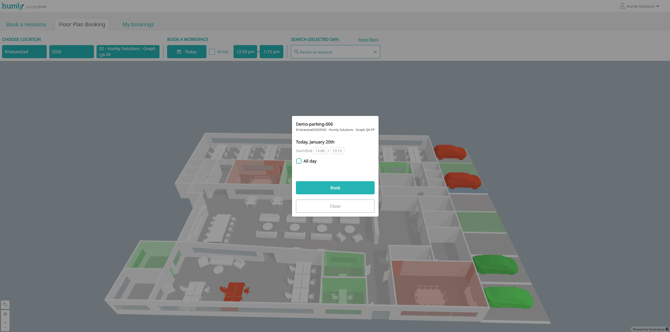
Book a Parking Space
Booking a parking space is similar to room booking and desk booking and follows the same procedure.
Creating a Parking Space Booking
- Use the calendar to select your desired date
- Use the location filter to navigate to the correct location
- Click on an available parking space (shown in green)
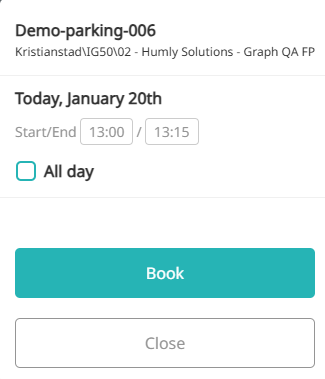
- The parking space booking dialog appears
- Adjust the time as needed
- Click Book to confirm
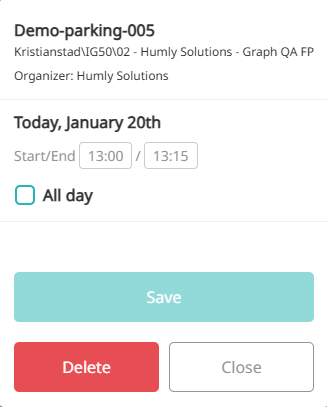
Modifying or Deleting a Parking Space Booking
Deleting or modifying a booking follows the same procedure as for rooms and desks:
- Click on the parking space (which will be red/booked)
- The booking dialog appears with your booking details
- Click the Delete button to cancel the booking, or edit the meeting details and click the Save button.
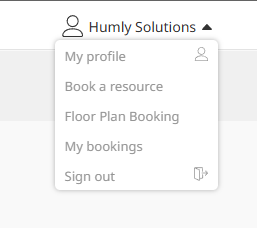
Navigate Between Humly Products
You can always switch between different Humly Workspace products (Reservations, Floor Plan, and My Bookings section) using the header taps.

Or by using the user drop-down menu
- Click on the user dropdown menu in the top right section of the screen
- Select the product you want to access
Search for a Resource
It is possible to search for a specific resource in the floor plan by typing the resource name in the search field.
How to Search for Resources
- Click on the search field at the top of the floor plan
- Start typing the resource name
- You will get suggestions in the dropdown menu under the search field if the resource is found
- Select the resource you want to find from the dropdown
Search Results
Once you select the resource:
- The resource will be marked on the floor plan with a visual indicator
- The indicator shows:
- Resource name
- Current status (Free/Busy)
This makes it easy to locate specific rooms, desks, or parking spaces on large floor plans.

Search for a Colleague
Similar to searching for a resource, you can also search for colleagues and find any bookings they have made on the floor plan.
Note: This feature must be enabled by your administrator in the floor plan Privacy Settings. If set to "Resources only," you will not be able to search for colleagues.
How to Search for Colleagues
- Click on the search field at the top of the floor plan
- Start typing your colleague's email address
- You will get suggestions in the dropdown menu if the entry is found
- Select the email address you want to search for
Search Results
Once you select the email:
- The colleague's booking(s) will be marked on the floor plan with visual indicators
- Each indicator shows:
- The resource(s) that have been booked
- Start and end time of each booking
This is useful for:
- Finding where a colleague is located
- Seeing which meeting rooms they have reserved
- Planning meetings in nearby spaces
Use Humly Floor Plan with Microsoft Teams
Humly Floor Plan - like many Humly Workspace Solutions - can be used directly from Microsoft Teams.
Prerequisites
Humly Teams integration must be configured by your Humly Control Panel administrator. See the Humly Teams Integration documentation for setup instructions.
Accessing Floor Plan from Teams
Once the configuration is complete:
- Click on the Humly Workspace application icon in Microsoft Teams
- The Humly Reservations screen will appear
- Select Floor Plan Booking
- Select the structure (building/floor) you want to use
- The map will load and you can use Humly Floor Plan as needed
All the same booking, search, and navigation features are available when using Floor Plan through Microsoft Teams.
Understanding Different Floor Plan Access Methods
Floor Plan in Humly Reservations (This Guide)
When you access Floor Plan through Humly Control Panel (Reservation) or Microsoft Teams:
- Full location browsing (all countries, cities, buildings, floors)
- Authenticated with your user account
- Bookings automatically attributed to you
- Access to all Humly Workspace Solutions
- Integrated navigation between Reservations, Desk Booking, and Floor Plan
Standalone Floor Plan Kiosk (See Floor Plan Interactive Booking Guide)
When using a standalone floor plan screen:
- 📍 Locked to a specific location (single building/floor)
- 🔐 PIN authentication required for bookings (Interactive mode), Anonymous bookings can be configured per resource.
- 📺 Designed for public displays, lobby kiosks, room and desk booking station
- ♻️ Auto-reset after idle timeout (kiosk mode)
- 👀 May be view-only (Static mode) or bookable (Interactive mode)
For detailed instructions on using standalone kiosk screens, see the Floor Plan Interactive Booking Guide.
Tips and Best Practices
Making Effective Bookings
- Set clear subjects: Use descriptive meeting titles so colleagues can see the purpose
- Invite attendees: Add email addresses to send calendar invitations
- Book appropriate duration: Only book the time you need to maximize resource availability
- Check equipment: Verify the room has the equipment you need before booking
Using Search Effectively
- Resource search: Type partial names to find resources quickly
- Colleague search: Use full email addresses for best results
- Visual indicators: Look for the markers on the floor plan to locate resources
Managing Your Bookings
- Delete unused bookings: Cancel bookings you no longer need to free up resources
- Modify times: Adjust booking duration if your meeting changes
- Check conflicts: Verify availability before inviting attendees
Troubleshooting
Floor Plan Not Loading
- Check your internet connection
- Ensure you have the required permissions
- Try refreshing the page
- Contact your administrator if the issue persists
Cannot Find a Resource
- Verify the resource is mapped to the floor plan (ask your administrator)
- Check that you've selected the correct location/structure
- Ensure the resource name is spelled correctly in search
Booking Not Syncing
- Verify the resource calendar is active
- Contact your administrator if bookings consistently fail to sync
Cannot Search for Colleagues
- This feature may be disabled by your administrator for privacy reasons
- Check with your administrator about Privacy Settings configuration
Related Documentation
- Humly Floor Plan - Admin Guide - Configuration and setup instructions
- Humly Floor Plan - Interactive Booking - Using standalone floor plan screens
- Humly Teams Integration - Setting up Humly within Microsoft Teams
- Screen Approval - Device authorization for kiosk displays
Need Help?
If you encounter issues or have questions about using Humly Floor Plan:
- Check this guide for instructions on common tasks
- Contact your local administrator for organization-specific questions
- Visit the Humly Knowledge Base for additional resources
- Contact Humly Support for technical assistance