Introduction
This guide provides step-by-step instructions for creating, editing, and managing user accounts in Humly Control Panel. Use this guide to perform day-to-day user management tasks.
Before you begin: If you're new to HCP user management, we recommend reading Accounts and Users in HCP first to understand user types, the difference between HCP and booking system accounts, and how credentials work.
Table of Contents
- Creating a Single User
- Editing an Existing User
- Managing User Credentials
- Revoking Multi-Factor Authentication (MFA)
- Deleting Users
- Bulk Import Options
- Exporting Users
- Managing SSO Users
- User Table Features
- User Fields Reference
- Troubleshooting
- Best Practices
Creating a Single User
Prerequisites
- You must be logged in as a Global Admin
- You need the user's email address and full name
- Determine the appropriate user type (see Accounts and Users in HCP for user type descriptions)
Steps
-
Navigate to Users Section
- Log into Humly Control Panel
- Click Users in the left navigation menu
-
Click Add User
- Click the "Add user" button (top left)
- The Add User dialog opens
-
Enter Required Information
Email (required)
- Enter the user's email address
- This will become their username for logging into HCP
- Must be a valid email format
- Must be unique in the system
- Cannot be changed after creation
Full Name (required)
- Enter the user's complete name
- This appears in bookings and reports
-
Enter Optional Information
Organization (optional)
- Company name, department, or division
- Maximum 40 characters
- Cannot contain
<,>, or@characters
Description (optional)
- Additional information about the user
- Job title, employee ID, location, notes, etc.
- Free-text field, searchable
Phone Number (optional)
- Contact phone number
- Use international format (e.g.,
+46701234567) - Used for SMS notifications if configured
Reg. Number (Vehicle) (optional)
- Vehicle license plate numbers
- Can add up to 5 plates per user
- Used for parking space bookings
- Click "+" to add multiple plates
- Click the User Type dropdown
- Select the appropriate type:
- Admin (Global Admin) - Full system access
- LocalAdmin (Local Admin) - Limited to assigned structures
- User - Standard booking user
- Guest - External/temporary users
- VisitorAdmin (Visitor Admin) - Visitor management
- StatisticsUser (Statistics User) - Reports only
-
Assign Structures (for Local Admin, Visitor Admin, Statistics User only)
- Click to expand the Structure Assignment section
- Select which locations this user can manage:
- Country level - Access to all cities/buildings in that country
- City level - Access to all buildings in that city
- Building level - Access to all floors in that building
- Floor level - Access to that specific floor only
- You can assign multiple structures
- Global Admins automatically have access to all structures (no assignment needed)
-
Review and Create
- Review all entered information
- Click "Add" button
- Success message appears: "User [name] successfully created"
⚠️ Important: If the user's email doesn't exist in your booking system (Microsoft 365, Google, Exchange), you can only create them as a Guest user.
What Happens Next
-
Email Sent Automatically
- User receives a welcome email containing:
- Username: Their email address
- Temporary Password: Auto-generated password
- PIN: Auto-generated numeric PIN
- Link: URL to Humly Control Panel
- User receives a welcome email containing:
-
Account is Active
- User can log in immediately
- User appears in the Users list
- For Local Admins: Can only access assigned structures
-
Recommended Next Steps
- User should log in and change their password
- User should set up MFA (Multi-Factor Authentication) for security
- User should update their profile with additional information if needed
Editing an Existing User
Steps
-
Locate the User
- Navigate to Users section
- Use the search filter to find by name or email
- Or scroll through the user list
-
Open Edit Dialog
- Click the three-dot kebab menu (⋮) on the right side of the user row
- Select "Edit User"
- If editing your own account, it will say "My Profile"
-
Modify User Information
You can update:
- Full Name
- Organization
- Description
- Phone Number
- License Plates (add/remove)
- User Type (see restrictions below)
- Language (interface language for Humly Reservations)
- Structure Assignment (for Local Admins only)
You cannot change:
- Email address (username)
-
Update Structure Assignment (Local Admins, Visitor Admins, Statistics Users)
- Expand the Structure Assignment section
- Add or remove assigned structures
- Changes take effect immediately upon saving
-
Save Changes
- Click "Save" button
- Success message appears
- User's information is updated immediately
User Type Change Restrictions
You cannot change user type in these scenarios:
-
Editing your own account
- Prevents accidentally removing your own admin privileges
- Have another Global Admin change your type if needed
-
User is SSO-authenticated
- User type controlled by SSO group membership
- Change groups in Azure AD/ADFS instead
- User is a Guest in non-internal booking systems
- Guest users cannot be promoted to other types
- User must have an account in the booking system first
- You're not a Global Admin
- Only Global Admins can change user types
Managing User Credentials
Resetting a User's PIN
Individual User
- Find the user in the Users list
- Click the kebab menu (⋮) next to the user
- Select "Reset PIN"
- Confirm the action
- User receives an email with their new PIN
- Success message appears
Multiple Users
- Select users by clicking checkboxes next to their names
- Click "Manage Selected" dropdown button
- Select "Reset PIN"
- Confirm: "Reset PINs for [X] selected users?"
- Click "Reset PIN"
- All selected users receive emails with new PINs
- Success message: "PIN successfully reset for selected users"
All Users
- Click the kebab menu (⋮) in the table header (top right of table)
- Select "Reset all PINs"
- Confirm dialog appears: "Reset the PINs for all users?"
- Read: "All users will receive an email with their new PIN"
- Click "Yes"
- Success message: "All PINs have been reset"
- Every user receives an email with their new PIN
Resetting a User's Password
Individual User
- Find the user in the Users list
- Click the kebab menu (⋮) next to the user
- Select "Reset password"
- Confirm the action
- User receives an email with their new password
- Success message appears
⚠️ Note: Password reset is disabled for SSO users (password managed in identity provider)
Multiple Users
- Select users using checkboxes
- Click "Manage Selected" dropdown
- Select "Reset Password"
- Confirm: "Reset Password for [X] selected users?"
- Click "Reset Password"
- All selected users receive emails with new passwords
- Success message: "Password successfully reset for selected users"
Note: SSO users will be skipped automatically.
All Users
- Click the kebab menu (⋮) in the table header
- Select "Reset all passwords"
- Confirm dialog: "Reset the passwords for all users?"
- Read: "All users will receive an email with their new password"
- Click "Yes"
- Success message: "All passwords have been reset"
- Every user receives an email with their new password
⚠️ Warning: Use this feature carefully. Resetting all passwords forces every user to use new credentials.
Revoking Multi-Factor Authentication (MFA)
If a user loses access to their MFA device (phone, authenticator app), administrators can revoke their MFA setup so they can log in again.
When to Use This
- User lost their phone
- User switched to a new phone without transferring authenticator
- User deleted authenticator app accidentally
- User cannot access MFA codes for any reason
Steps to Revoke MFA
-
Identify User with MFA
- Look for the green checkmark (✓) in the MFA column
- This indicates the user has MFA enabled
-
Open User Menu
- Click the kebab menu (⋮) next to the user
- Select "Revoke MFA"
-
Confirm Revocation
- Confirmation dialog appears
- Click "Yes" or "Revoke"
-
MFA Removed
- Success message appears
- User can now log in with just email and password
- MFA checkmark (✓) disappears from the user's row
-
User Re-enables MFA
- User should log in immediately
- User should re-enable MFA in their profile settings
- Guide user through MFA setup again
⚠️ Important:
- You can only revoke MFA for other users, not your own account
- To disable your own MFA, use your profile settings
- After revoking MFA, encourage the user to re-enable it immediately for security
Deleting Users
Delete a Single User
- Find the user in the Users list
- Click the kebab menu (⋮) next to the user
- Select "Delete user" (shown in red/highlighted)
- Confirm dialog appears: "Do you want to delete [User Name]?"
- Click "Yes" or "Delete"
- Success message: "User deleted"
- User is removed from the list
Delete Multiple Users
- Select users using checkboxes
- Click "Manage Selected" dropdown
- Select "Delete" (highlighted in red)
- Confirm: "Delete [X] selected users?"
- Click "Delete"
- Success message: "Selected users successfully deleted"
- All selected users are removed
⚠️ Warning - User Deletion is Permanent:
- User accounts cannot be recovered after deletion
- User will no longer be able to log in
- User's bookings may be affected (depending on booking system settings)
- Historical data may be retained for reporting purposes
- Use caution when deleting users
Best Practice: Consider these alternatives before deleting:
- Disable the account instead (if your system supports it)
- Document the reason before deleting
- Export user data first if needed for records
- Check bookings to ensure no upcoming meetings are affected
You Cannot Delete: Your own account (prevents self-lockout)
- Have another Global Admin delete your account if needed
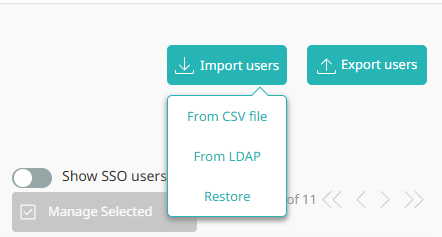
Bulk Import Options
For organizations with many users, Humly Control Panel provides three bulk import methods:
- Import from CSV - Upload a spreadsheet file
- Import from LDAP - Connect to Active Directory or LDAP server
- Import from Backend - Import directly from booking system (Google Only)
Method 1: Import from CSV File
Import users from a CSV (comma-separated values) file.
Step 1: Prepare the CSV File
Required Columns:
Name- User's full nameEmail- User's email address (becomes username)Type- User type (Admin, LocalAdmin, User, Guest, VisitorAdmin, StatisticsUser)
Optional Columns:
Description- Additional informationOrganization- Company or departmentPhoneNumber- Contact number in international formatLicensePlates- Vehicle registration (comma-separated for multiple)Language- Interface language code (en, sv, no, da, fi, de, fr, es, nl, pt, ro, vi)
Format Requirements:
- File must be saved as
.csvformat (not.xlsor.xlsx) - First row must contain column headers (exactly as shown above)
- Each subsequent row is one user
- Email addresses must be unique
- Use UTF-8 encoding for special characters
Example CSV:
Name,Email,Type,Organization,Description,PhoneNumber,LicensePlates
John Smith,john.smith@company.com,User,Sales,Sales Representative,+46701234567,ABC123
Jane Doe,jane.doe@company.com,LocalAdmin,IT,IT Manager,+46701234568,DEF456;GHI789
Bob Johnson,bob@external.com,Guest,External,Consultant,+46701234569,
💡 Tip: You can download the CSV template from the importing users from our knowledge base on this link.
Step 2: Import the CSV File
-
Navigate to Users
- Go to Users in Humly Control Panel
-
Open Import Dialog
- Click "Import users" dropdown button
- Select "Import from CSV"
-
Upload File
- Click "Choose File" and select your CSV file
-
Enter Report Email (Optional)
- Enter email address to receive import report
- Defaults to your email address
- Report contains import results and any errors
-
Confirm Import
- Click "Import" button
- Progress indicator shows import status
- Wait for import to complete (may take a few minutes for large files)
-
Verify Results
- Success message: "All users from CSV imported successfully"
- New users appear in the Users list
- All users receive welcome emails with credentials
Common CSV Import Errors
"Invalid email format"
- Email must be valid format (name@domain.com)
- No spaces allowed in email addresses
"Duplicate email address"
- Email already exists in system
- Remove duplicate from CSV or use unique email
"Invalid user type"
- Type must be exact match: Admin, LocalAdmin, User, Guest, VisitorAdmin, StatisticsUser
- Check for typos and capitalization
"Missing required field"
- Every row must have Name, Email, and Type
- Empty cells in required columns cause errors
"Invalid phone number format"
- Use international format: +46701234567
- No spaces or special characters except +
Method 2: Import from LDAP/Active Directory
Import users directly from your organization's LDAP server or Active Directory.
Prerequisites
- LDAP server hostname and port
- LDAP admin or service account credentials
- Network connectivity between HCP and LDAP server
- For cloud customers: LDAP server must be publicly accessible via internet
Step 1: Gather LDAP Information
You'll need:
- Server: LDAP hostname or IP (e.g.,
ldap.company.comor192.168.1.100) - Port: Usually
389for LDAP or636for LDAPS (secure) - Username: LDAP admin account (e.g.,
CN=admin,DC=company,DC=com) - Password: LDAP admin password
- Base DN: Base Distinguished Name (e.g.,
DC=company,DC=com) - Search Filter: LDAP query to find users
Step 2: Import from LDAP
-
Navigate to Users
- Go to Users in Humly Control Panel
-
Open Import Dialog
- Click "Import users" dropdown button
- Select "Import from LDAP"
-
Enter LDAP Server Details
- Server: Enter hostname or IP address
- Port: Enter port number (389 or 636)
- Username: Enter LDAP admin username
- Password: Enter LDAP admin password
- Base DN: Enter base distinguished name
-
Test Connection
- Click "Test Connection" button
- Wait for validation
- Success: "Connection successful, [X] users found"
- Error: Check server details and credentials
-
Configure Search Filter
- Paste or type your LDAP search filter
-
Confirm Import
- Click "Import" button
- Wait for import to complete
- Success message: "All users from LDAP imported successfully"
-
Verify Results
- Success dialog appears showing:
- Number of users added
- Number of users updated
- Number of users to delete (if any)
- Success dialog appears showing:
⚠️ Important:
- Test connection first to validate settings before importing
- All imported users are automatically created as User type
- You must manually change user types to Admin or LocalAdmin after import
- Import can add, update, or delete users based on LDAP sync
- Be careful with deletions - users not in LDAP will be flagged for deletion
The recommended LDAP search filter for importing user that is stored on Azure Active Directory is:
(&(objectClass=organizationalperson)(objectClass=user)(userPrincipalName=*))
LDAP Import Notes
For Cloud Customers:
- Your LDAP server must be accessible from the internet
- Consider security implications of exposing LDAP publicly
- Use LDAPS (port 636) for encrypted connections
- Whitelist Humly cloud IP addresses if possible
For On-Premise Customers:
- LDAP server can be internal
- Ensure HCP server can reach LDAP server
- Check firewall rules
Troubleshooting:
- If connection fails, verify network connectivity
- Test LDAP credentials with another LDAP client tool
- Check LDAP server logs for errors
- Verify Base DN is correct
Method 3: Import from Backend Booking System (Google Only)
Import users directly from your Google Calendar booking system.
⚠️ Important: This import method is only available for Google booking systems. It is not supported for Microsoft 365, Exchange, or other booking systems.
When to Use This
- Your booking system is Google Calendar (Google Workspace)
- Google integration is fully configured
- You want to import all users from your Google domain
- Service account has permissions to list users in Google Admin
Prerequisites
- Booking system configured as Google Calendar
- Service account has Directory API permissions in Google Workspace
- You're logged in as Global Admin
Steps
-
Navigate to Users
- Go to Users in Humly Control Panel
-
Open Import Dialog
- Click "Import users" dropdown button
- Select "Import from Backend"
- Note: This option only appears if Google Calendar is configured
-
Confirm Import
- Dialog appears: "Do you want to import users from backend?"
- Click "Yes"
-
Import Process
- System connects to Google Workspace
- Retrieves user list from Google Directory
- Creates corresponding Humly accounts
- May take several minutes for large organizations
-
Wait for Completion
- Do not close the browser
- Success message: "Users imported successfully"
-
Verify Results
- New users appear in Users list
- Check user count matches expectations
- All users receive welcome emails with credentials
After Import
- All imported users are created as User type by default
- You must manually change user types to Admin or LocalAdmin
- Structure assignments must be configured manually for Local Admins
- Review and update additional user information as needed
⚠️ Note: This method only imports basic user information (email, name). Additional details (organization, description, phone number) must be added manually.
For Non-Google Booking Systems
If you're using Microsoft 365, Exchange, or other booking systems, use these import methods instead:
- Import from CSV - Prepare user list in spreadsheet
- Import from LDAP - Sync from Active Directory
- Manual Creation - Add users individually
Restore Users from Last CSV Import
If you accidentally overwrote or deleted users during a CSV import, you can restore to the state before the last import.
Steps
-
Open Import Menu
- Click "Import users" dropdown
- Select "Restore"
-
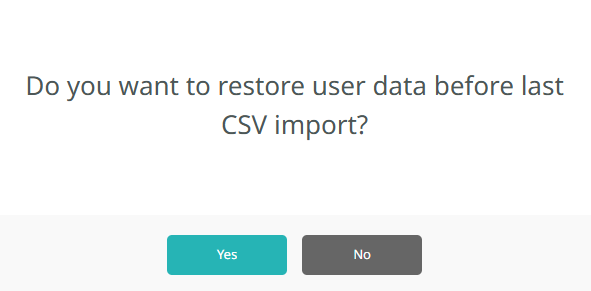
Confirm Restore
- Dialog appears: "Do you want to restore user data before last CSV import?"
- Click "Yes"
-
Restoration Process
- System reverts to the state before the most recent CSV import
- Users who were deleted are restored
- Users who were modified are reverted
- Success message: "All users restored successfully"
-
Verify Results
- Check Users list
- Verify previous state is restored
⚠️ Warning:
- This only restores from the most recent CSV import
- Multiple consecutive restores are not supported
- Use immediately after discovering import mistake
- Does not restore from LDAP or backend imports, only CSV
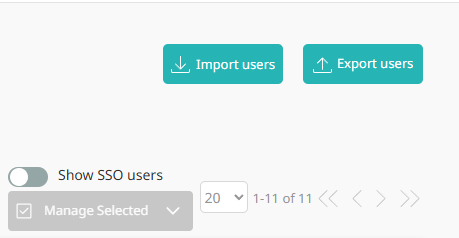
Exporting Users
Export all users to a CSV file for backup, analysis, or migration purposes.
Steps
-
Navigate to Users
- Go to Users in Humly Control Panel
-
Click Export
- Click the "Export users" button
- File is generated automatically
-
Download File
- CSV file downloads to your computer
- Filename:
users_export_[date].csv - Open in Excel, Google Sheets, or any spreadsheet application
Exported Data Includes
- Email address
- Full name
- User type
- Organization
- Description
- Phone number
- License plates (semicolon-separated)
- Last active timestamp (UTC)
- MFA status
- SSO status
Note: Structure assignments for Local Admins are not included in the export. These must be documented separately if needed.
Use Cases for Export
-
Regular Backups - Export weekly/monthly for user data backup
-
Auditing - Review user accounts and permissions
-
Reporting - Generate user lists for management
-
Migration - Move users to another system
-
Analysis - Analyze user data in spreadsheet
-
Documentation - Share user lists with other administrators
Managing SSO Users
If your organization uses Single Sign-On (SSO) via Azure AD or ADFS, SSO users have special handling in HCP.
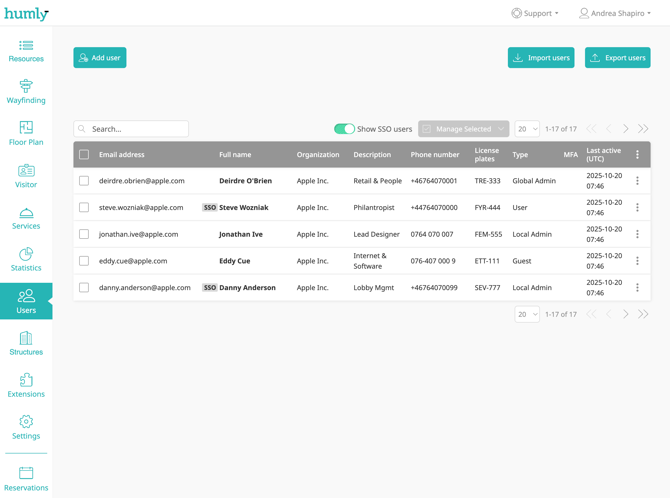
Identifying SSO Users
SSO users are identified by:
- Gray"SSO" badge next to their name in the users list
Show/Hide SSO Users
By default, SSO users may be hidden to reduce list clutter.
To Show SSO Users:
- Locate the "Show SSO users" toggle (top right of users table)
- Click the toggle to enable
- SSO users now appear in the list with SSO badges
- Your preference is saved in browser
To Hide SSO Users:
- Click the "Show SSO users" toggle again
- Toggle switches to disabled
- SSO users are hidden from the list
- Your preference is saved
💡 Tip: Hide SSO users when managing only manual accounts to focus on users you directly control.
Managing SSO Users
What You Can Do:
-
Edit user profile (name, organization, description, phone, license plates)
-
Reset PIN
-
Delete user
-
Assign structures (for Local Admins)
-
View last active time
What You Cannot Do:
-
Reset password (managed in identity provider)
-
Change user type if controlled by SSO groups
-
Change email address
SSO User Type Management
If user type is controlled by SSO groups:
- User type dropdown is disabled in HCP
- To change user type: Update group membership in Azure AD/ADFS
- Changes sync to HCP automatically
- User type shows as read-only in edit dialog
If user type is NOT controlled by SSO groups:
- User type can be changed normally in HCP
- Follow standard user type change process
User Table Features
Table Columns
| Checkbox | Select user for bulk actions |
| Email address | Username with copy button |
| SSO | Gray"SSO" badge if SSO user |
| Full name | User's complete name |
| Organization | Company or department |
| Description | Additional user info |
| Phone number | Contact phone |
| License plates | Vehicle registrations (semicolon-separated) |
| Type | User type (Admin, User, etc.) |
| MFA | Green ✓ if MFA enabled |
| Last active (UTC) | Last login timestamp |
| Menu | Kebab menu (⋮) for actions |
Searching and Filtering
Search Users
- Click in the search box at the top of the table
- Type to search by:
- Email address
- Full name
- Organization
- Description
- Results filter instantly as you type
- Search is case-insensitive
Pagination
- Navigate pages using controls at bottom of table
- Shows: "Showing X-Y of Z users"
- Adjust items per page if available
Bulk Selection
Select All (Current Page)
- Click the checkbox in table header
- All users on current page are selected
- Selection count appears in "Manage Selected" button
Select Individual Users
- Click checkbox next to each user
- Selected users are highlighted
- Count updates in "Manage Selected" button
Clear Selection
- Click table header checkbox again
- Or click "Cancel" in bulk action dialogs
- Or refresh the page
Bulk Actions
Once users are selected:
- Click "Manage Selected" dropdown
- Choose action:
- Reset PIN - Reset PINs for selected users
- Reset Password - Reset passwords for selected users
- Delete - Delete selected users (warning: permanent)
- Confirm the action
- Success message appears
- Selection is cleared
User Fields Reference
Email (Required)
Purpose: User's username for logging into HCP
Format: Valid email address (name@domain.com)
Restrictions:
- Must be unique in the system
- Cannot be changed after user creation
- Cannot contain spaces
- Must be valid email format
Best Practices:
- Use corporate email addresses
- Use same email as in booking system (easier to manage)
- Avoid generic emails (admin@, info@)
Full Name (Required)
Purpose: User's display name in bookings and reports
Format: Free text
Examples:
- John Smith
- Jane Doe-Johnson
- Dr. Robert Anderson
- María García
Best Practices:
- Include first and last name
- Use proper capitalization
- Include titles if relevant (Dr., Prof.)
- Include middle names if needed for uniqueness
Organization (Optional)
Purpose: Company, department, or division
Format: Text, maximum 40 characters
Restrictions:
- Cannot contain:
<,>,@ - Only Global Admins can edit this field
Examples:
- Sales Department
- IT Support
- External Contractors
- Finance Team
Use Cases:
- Filtering users by department
- Reporting by organization
- Access control by division
Description (Optional)
Purpose: Additional information about the user
Format: Free text
Restrictions:
- Only Global Admins can edit this field
Examples:
- "VP of Sales - Stockholm Office"
- "Employee ID: 12345"
- "Temporary contractor - expires Dec 2024"
- "Reports to: Jane Smith"
Use Cases:
- Job titles
- Employee IDs
- Location information
- Contract dates
- Reporting relationships
- Notes for administrators
Phone Number (Optional)
Purpose: Contact phone number
Format: International format recommended
Validation: Must match phone number pattern
Recommended Format:
+46701234567(Sweden)+442012345678(UK)+12125551234(US)
Invalid Formats:
070-123 45 67(contains spaces and dashes)0701234567(missing country code)
Use Cases:
- SMS notifications (if configured)
- Contact information for reception
- Emergency contact
- Visitor management
Reg. Number (Vehicle) (Optional)
Purpose: Vehicle license plate numbers
Format: Free text, up to 5 plates per user
Display: Semicolon-separated in table
How to Add Multiple Plates:
- Enter first plate
- Click "+" button
- Enter next plate
- Repeat up to 5 plates
Examples:
ABC123XYZ 789AB-12-CD
Use Cases:
- Parking space booking
- Parking access control systems
- Visitor parking validation
- Parking lot reporting
User Type (Required)
Purpose: Determines user permissions and access
Options:
- Admin (Global Admin)
- LocalAdmin (Local Admin)
- VisitorAdmin (Visitor Admin)
- StatisticsUser (Statistics User)
- User
- Guest
Restrictions:
- Cannot change your own user type
- Cannot change if user is SSO-controlled
- Cannot change Guest users in some booking systems
See Also: Accounts and Users in HCP for detailed user type descriptions
Language (Optional)
Purpose: Interface language for Humly Reservations
Options:
- English (en)
- Swedish (sv)
- Norwegian (no)
- Danish (da)
- Finnish (fi)
- German (de)
- French (fr)
- Spanish (es)
- Dutch (nl)
- Portuguese (pt)
- Romanian (ro)
- Vietnamese (vi)
Note:
- Only affects Humly Reservations interface
- Does not change Humly Control Panel language
- Default: English
Structure Assignment (Local Admins, Visitor Admin and Statistics User)
Purpose: Defines which locations admin can manage
Hierarchy: Country > City > Building > Floor
Multiple Assignments: Allowed
How It Works:
- Assign at Country level → Access all cities, buildings, floors in that country
- Assign at City level → Access all buildings and floors in that city
- Assign at Building level → Access all floors in that building
- Assign at Floor level → Access only that floor
Example: Assign "Stockholm" city → Admin manages all Stockholm buildings and floors, but not other cities
Who Can Assign:
- Only Global Admins
- Cannot self-assign structures
Troubleshooting
User Not Receiving Welcome Email
- Check spam/junk folder and add noreply@humly.com or you configures sender account to safe senders
- Verify email address is correct in user profile
- Resend by resetting password or PIN
- Contact Humly support if emails consistently fail
Cannot Change User Type
- Cannot change your own user type (have another admin do it)
- Cannot change SSO users (controlled by Azure AD/ADFS groups)
- Cannot promote Guest users in external booking systems
- Only Global Admins can change user types
CSV Import Errors
- Invalid email: Use format
name@domain.com - Duplicate email: Email already exists or appears twice in CSV
- Invalid user type: Use exact values (Admin, LocalAdmin, User, Guest, VisitorAdmin, StatisticsUser)
- Missing field: Every row needs Name, Email, and Type
- Wrong format: Save as
.csvnot.xlsor.xlsx
LDAP Connection Failed
- Verify server address, port (389 for LDAP, 636 for LDAPS), and credentials
- Check firewall rules allow connection
- For cloud: LDAP server must be internet-accessible
Cannot Delete User
- Cannot delete your own account (security measure)
- Only Global Admins can delete users
"Last Active" Shows Old Date
- "Last active" only tracks HCP web logins
- Users making bookings via Outlook/Google don't update this
- Check booking reports for actual activity
MFA Revoke Not Working
- Wait 1-2 minutes for changes to propagate
- Clear browser cache or hard refresh (Ctrl+F5)
- Verify you revoked MFA for correct user
Structure Assignment Not Working
- User must log out and back in after assignment
- Structure assignment only works for Local Admin, Visitor Admin, Statistics User
- Verify correct structure level assigned (country/city/building/floor)
For issues not listed here, contact Humly support: support@humly.com
Best Practices
User Creation
-
Consistent Naming: Use full names (First Last) consistently
-
Corporate Emails: Use company email addresses
-
Descriptive Organizations: Use clear department/division names
-
Document Guest Users: Note why user is Guest in description field
-
Structure Assignment: Assign minimum necessary structures
Security
-
Multiple Global Admins: Always maintain 2-3 Global Admin accounts
-
Enable MFA: Require MFA for all Global Admins
-
Regular Audits: Review user list quarterly
-
Remove Inactive Users: Delete or disable users who left organization
-
Strong PINs: Configure longer PINs (6+ digits) for high-security environments
Bulk Operations
-
Test First: Import small CSV sample before full import
-
Backup Before Import: Export current users before bulk import
-
Validate CSV: Check CSV in spreadsheet before importing
-
LDAP Test Connection: Always test LDAP connection before import
-
Document Imports: Keep records of when/why bulk imports were done
User Type Management
-
Least Privilege: Assign minimum necessary user type
-
Default to User: Most employees should be "User" type
-
Limited Local Admins: Only assign Local Admin to those who need it
-
Review Regularly: Audit admin accounts quarterly
-
Demote When Leaving Role: Change user type when job role changes
Credential Management
-
Regular PIN Resets: Reset all PINs annually
-
Password Policy: Follow organizational password policies
-
Document Resets: Note why credentials were reset
-
User Communication: Notify users before bulk credential resets
-
MFA Encouragement: Promote MFA adoption for all users
Related Documentation
- Accounts and Users in HCP - Understanding user types, accounts, and credentials
- Booking System Preparation - Setting up MS365, Google, Exchange integration
- Single Sign-On Setup - Configuring Azure AD or ADFS
- Humly Visitor Management - Visitor Admin features and workflows