
Trusted CA certificates let Humly Control Panel (HCP) connect securely to your own Exchange, LDAP, AD FS and SMTP servers when their certificates come from your organization's internal Certificate Authority. You upload the CA's root and intermediate certificates once, and HCP trusts them right away, with no restart and no server access.
Contents
- Before you start
- Upload certificates during setup
- Manage certificates in Settings > System
- How HCP uses the certificates
- Troubleshooting
- Collecting information for support
Before you start
- Installation type: on-premises installations (Windows or Linux) only. Humly Cloud does not show this feature.
- Version: Humly Control Panel 2.5 or later.
- Who: a Global Admin. During the setup wizard no sign-in is needed.
- Files: the root certificate of your internal CA, plus any intermediate certificates, in PEM format (
.crtor.pem, Base64 text starting with-----BEGIN CERTIFICATE-----). Maximum 256 KB per file. One file may hold the whole chain.
To export the root certificate from a Microsoft CA, run this on the CA server and upload ca-root.crt:
certutil -ca.cert ca-root.cer certutil -encode ca-root.cer ca-root.crtYou do not need to upload publicly trusted certificates (for example Microsoft 365 or Google). HCP already trusts those.
Upload certificates during setup
Upload the CA certificates in the setup wizard, before HCP connects to your booking system.
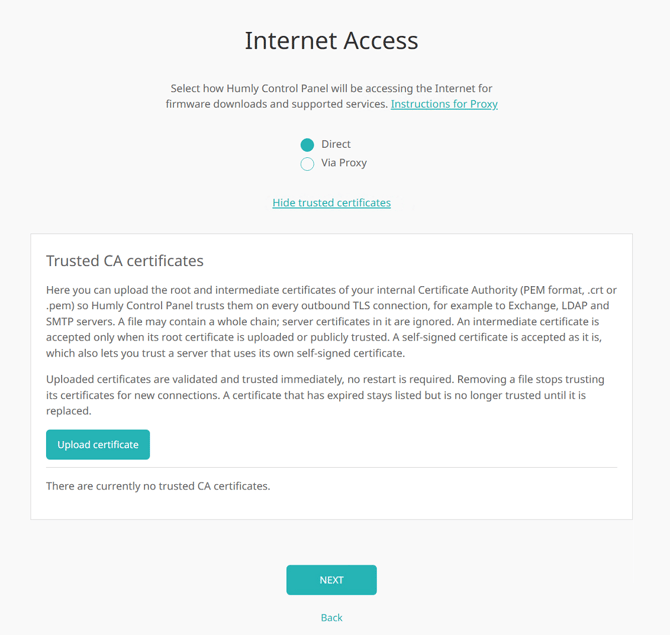
- In the Internet Access step, click Upload trusted certificates.
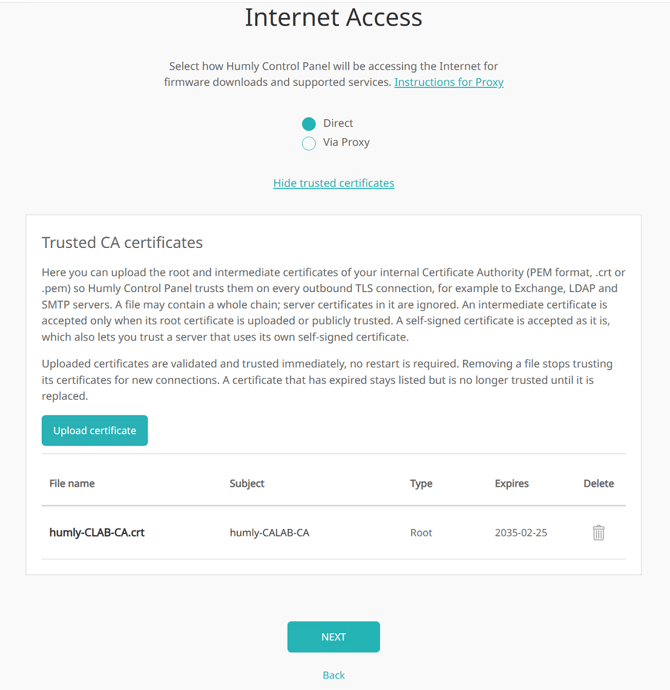
- Click Upload certificate and select your root certificate file.
- Check the new row: Subject shows the CA name, Type shows Root or Intermediate, and Expires shows the end date.
- Upload any intermediate certificates the same way, then click NEXT.
- In the booking system step, leave Allow untrusted SSL/TLS certificates unticked. HCP now verifies your server with the uploaded CA.
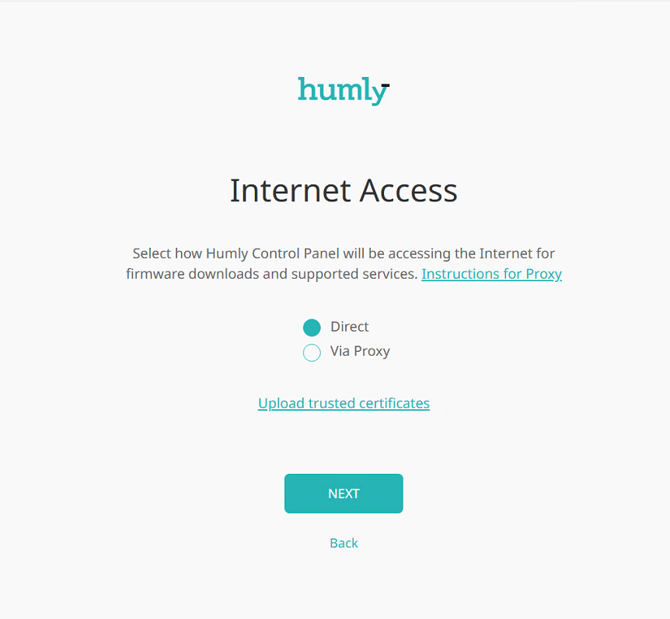
The certificates you upload here appear later in Settings > System. You do not upload them again.
Manage certificates in Settings > System
Go to Settings > System to see, add, download or remove trusted CA certificates.
- Add: click Upload certificate and select the file. It is checked and trusted at once.
- Check: each row shows the File name, Subject, Type (Root or Intermediate) and Expires date. A file with a whole chain shows one row per CA certificate.
- Download: click the file name to download the file under its original name, for example to compare it with the source.
- Remove: click the bin icon and confirm with Yes. HCP stops trusting the file's certificates at once.
- Replace: upload the new file first, then remove the old one.
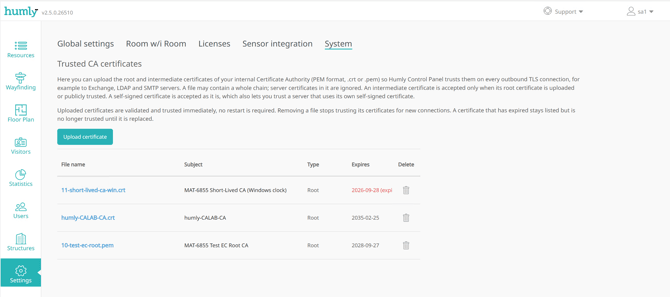
Remove an intermediate certificate before its root. HCP blocks removing a root while another uploaded certificate depends on it.
How HCP uses the certificates
HCP trusts an uploaded certificate for every outbound secure connection, straight after the upload and without a restart.
- Connections: Exchange (EWS), LDAP over TLS, AD FS sign-in and SMTP use the uploaded certificates.
- ADFS exception: HCP keeps the AD FS signing keys once it has fetched them. After you remove a CA, AD FS sign-in keeps working until HCP restarts.
- Upgrades and backups: certificates stay after a restart or an upgrade. They are part of the HCP backup and come back with a restore.
- Expired certificates: the row shows (expired, not trusted) and HCP no longer trusts it. Upload the renewed certificate and remove the old one.
- Chains: an intermediate certificate is accepted only when its root is uploaded or publicly trusted. Server certificates inside a chain file are ignored.
- Self-signed servers: a self-signed certificate is accepted as it is. This lets HCP trust a server that uses its own self-signed certificate.
- Existing setups: a CA added earlier through
NODE_EXTRA_CA_CERTSstays trusted. You can move it to Settings > System and remove the manual setting.
The files are stored in application_data/certificates/trusted_certificates in the HCP installation folder. On Linux only the HCP service user can read them.
LDAP connections
From version 2.5, HCP checks the LDAP server's certificate. Users > Import users > From LDAP has a new option, Allow untrusted SSL/TLS certificates, next to Disable TLS.
- New LDAP setups: the option is off. Test Connection succeeds only when the server's CA is trusted, so upload your CA first.
- Existing LDAP setups: when you upgrade, HCP ticks the option for you, so imports keep working as before.
- Disable TLS: when TLS is disabled, the option is greyed out because no certificate is used.
To secure an existing setup, upload your CA in Settings > System. Then untick Allow untrusted SSL/TLS certificates and click Test Connection.
Troubleshooting
My file was refused. Why?
HCP checks every file before it trusts it. The message tells you what to fix.
|
Message |
Cause |
What to do |
|---|---|---|
|
Only .crt and .pem certificate files can be uploaded! |
Wrong file type |
Export the certificate as |
|
Size of file must be less than 262144 bytes. |
File larger than 256 KB |
Upload only the CA certificates |
|
CA SSL crt file is malformed! |
Not PEM text, often a binary (DER) file |
Convert it with |
|
File contains no CA certificate! |
The file holds only a server certificate |
Upload the CA that issued it |
|
CA certificate has expired! |
The CA's end date has passed |
Upload the renewed CA |
|
CA certificate is not valid yet! |
The CA's start date is in the future |
Check the date on the HCP server |
|
Certificate "…" is already uploaded! |
Same certificate uploaded before |
Nothing to do |
|
The root CA of "…" is not trusted, upload it first! |
Intermediate without its root |
Upload the root, then the intermediate |
|
"…" cannot be removed while "…" depends on it. |
Root still needed by an intermediate |
Remove the intermediate first |
I uploaded my CA but the connection still fails. What now?
Check that you uploaded the CA that issued the server's certificate, not a different one. If your CA has intermediates, upload those too. Use the command under Collecting information for support to see which CA the server presents.
Some messages don't mention certificates. Can they still be a certificate problem?
Yes. These messages can mean HCP does not trust the server's certificate:
- Exchange (adding a user, booking sync): Cannot read properties of undefined (reading 'headers')
- AD FS sign-in: User doesn't have access. Please contact the system administrator.
- SMTP: Failed to verify credentials for … Please check SMTP parameters.
Upload the server's CA in Settings > System and try again.
I removed a CA but ADFS sign-in still works. Why?
HCP keeps the AD FS signing keys until it restarts. Restart HCP to apply the removal to AD FS.
I can't see the System tab. Why?
The tab is shown only to a Global Admin on an on-premises installation. Humly Cloud does not have it.
Collecting information for support
Send us the HCP version, the operating system, the exact error message and the relevant part of the HCP log. Include the CA certificate file if we ask for it. It is public, but never send private keys.
Where to find the HCP log
|
Installation |
Log file |
|---|---|
|
Windows |
|
|
Linux |
|
Set Settings > Global settings > Logs to Info or Debug first. At Error or Warning level, the lines below are not written.
What to look for in the log
Trusting N trusted CA certificate(s).One line per HCP process after every upload or removal. N is the number of certificates in use.Skipping "…" … CA certificate has expired!A listed certificate is no longer trusted.… no longer reaches a trusted root …An intermediate lost its root. Upload the root again.unable to verify the first certificateorUNABLE_TO_VERIFY_LEAF_SIGNATUREHCP does not trust the server's certificate.
Check which CA a server uses
Run this from the HCP server to list the certificates the server presents. Compare the issuer (i: lines) with the CAs in Settings > System.
openssl s_client -connect exchange.example.local:443 -showcerts </dev/nullUse port 636 for LDAP over TLS. For SMTP with STARTTLS, add -starttls smtp and use port 587.