This article will cover the process of preparing Google Workspace for HCP integration. During the process you will configure the following:
- Create New Project
- Configure Project Authorization
- Global Calendar Sharing
- Create & Configure Resource Calendars
Table of Contents
- Common Use Cases
- Create New Project
- Create & Configure Resource Calendars
- Grant Humly Admin User API Permissions
- Grant Service Account and Admin User Permissions to Resources
- Best Practices
- Troubleshooting
Common Use Cases
- Setting up Humly Control Panel for the first time with Google Workspace as the booking backend.
- Adding new meeting rooms or desks to an existing Google Workspace integration.
- Updating the service account key after a key has expired or been revoked.
- Migrating an existing P12 key setup to JSON (required for HCP version 2.3 and later).
Create New Project
-
Navigate to Google Cloud Platform and log in using your Google Domain Admin account.
-
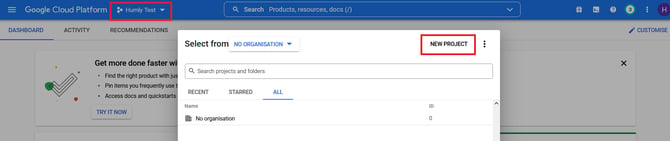
Click Create Project.
-
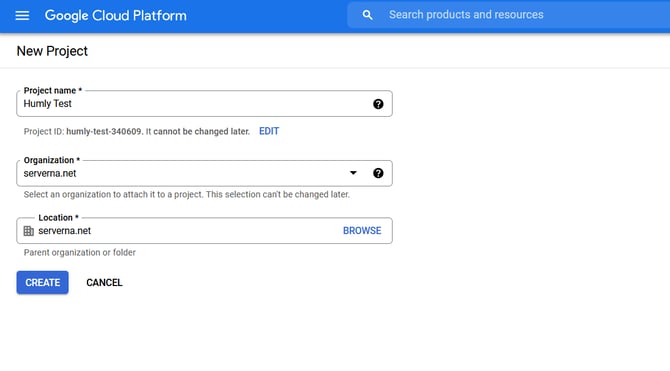
Enter a name for your project and click Create.
-
A notification should appear when the project is created.

-
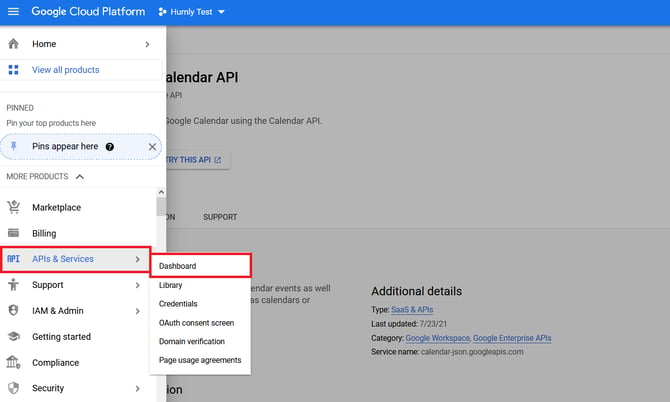
Click on the notification to reach the API Manager, or go to Menu Icon > API & Services > Dashboard.
-
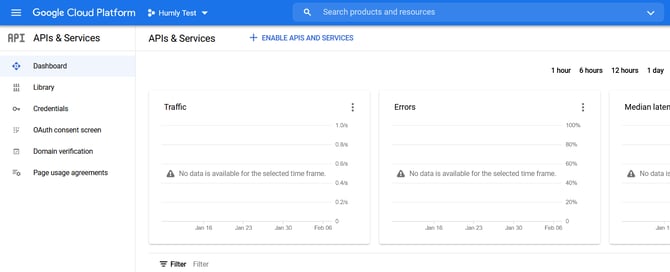
Click on Enable APIs and Services.
-
The API Library will appear. Search for Google Calendar API, select it and click Enable.


-
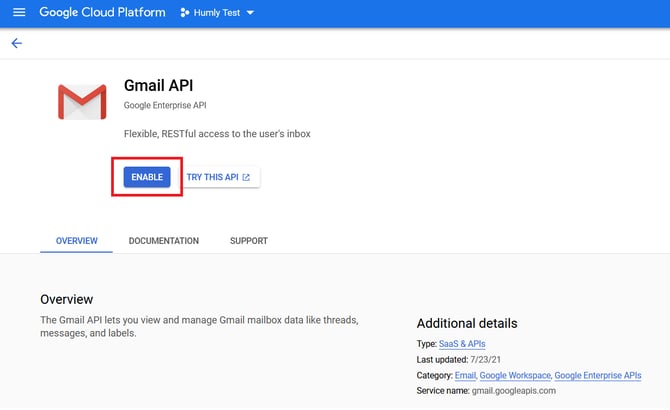
Repeat the previous step to enable the Gmail API.
-
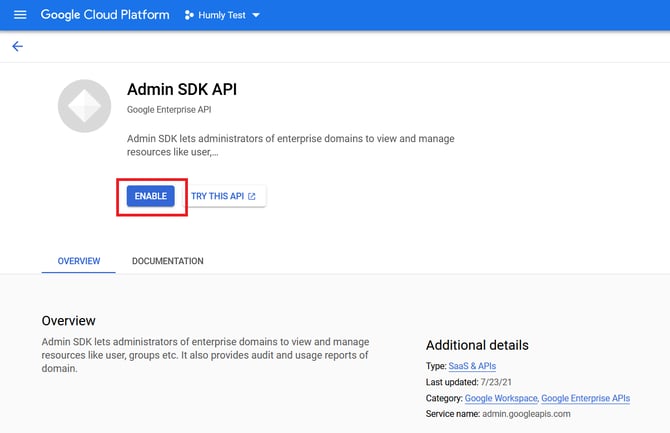
Enable the last needed API: Admin SDK API.
-
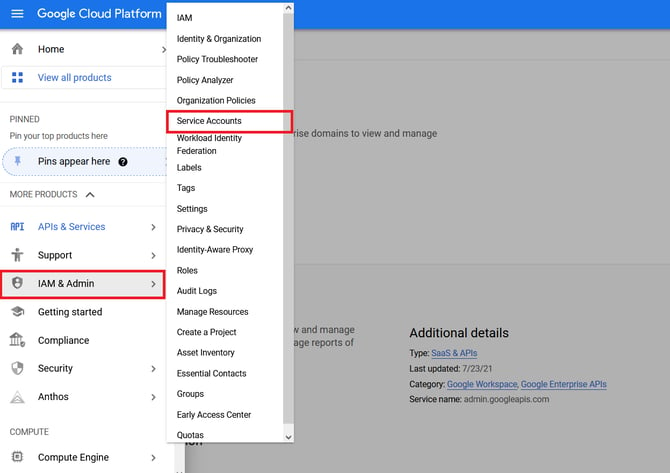
Click on the Menu Icon, select IAM & Admin, then select Service Accounts.
-
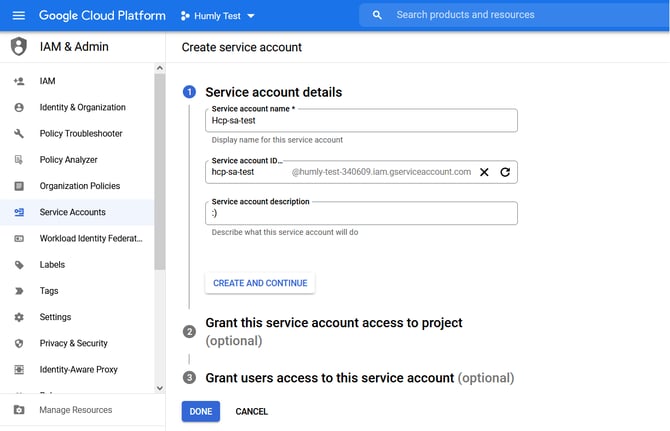
Click Create Service Account. Fill in the Name, ID and Description, then click Create And Continue.

-
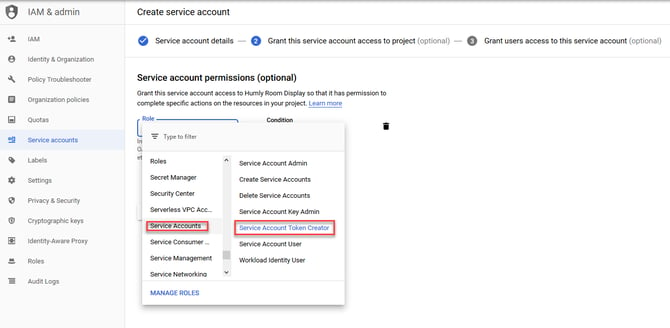
Assign the service account the role Service Account Token Creator from the drop-down menu and click Continue.
-
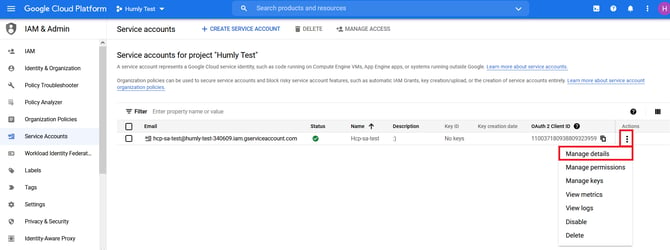
Click Done. The service account should appear in the list. Press Manage Details to collect the needed information and create a key.
-
Create a service account key by clicking on Keys, then Add Key.
⚠️ Important – HCP version 2.3 and later: From HCP version 2.3, new setups must use a JSON key. Select JSON as the key type and save the downloaded file — it will be needed when connecting HCP to Google Workspace.
If you are running an HCP version earlier than 2.3, select P12 instead. Existing P12-based setups do not need to be changed unless you are upgrading to HCP 2.3 or later and setting up a new connection.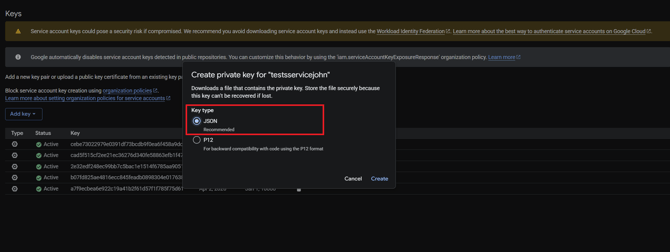
NOTE:
The Google service account JSON key is never stored in the database. Only the filename and a checksum are saved there. The key file itself is stored on the HCP server's filesystem, with the private_key field encrypted using AES-256 encryption before being written to disk. The encryption passphrase is a randomly generated secret stored in a separate file on the server, accessible only by the HCP process at the OS level.
The key is never exposed in logs, never sent to the browser, and is only decrypted in memory for the brief moment HCP needs to authenticate with Google. No human, including Humly support staff, can access the private key through the database or application logs. Server filesystem access would be required, which for self-hosted installations remains entirely within the customer's control. -
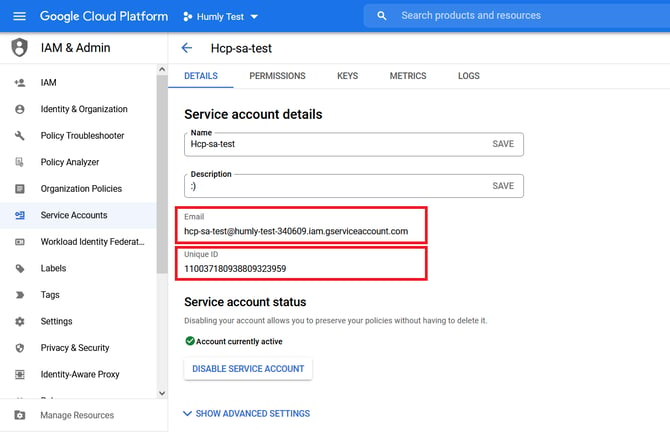
Take note of the Client ID and the service account email address as they will be needed in later steps.
-
Now grant the service account API access permissions. Navigate to admin.google.com, click Security, select Access and data control, then select API controls.
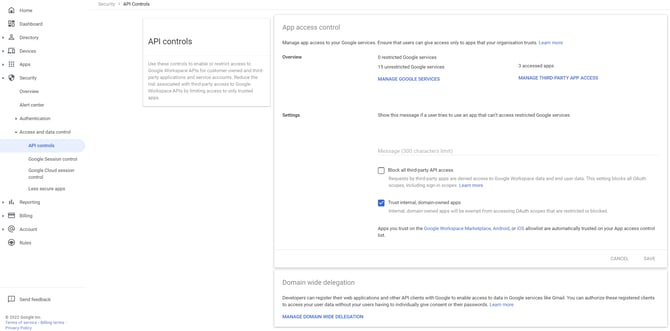
-
Select Manage Domain Wide Delegation.
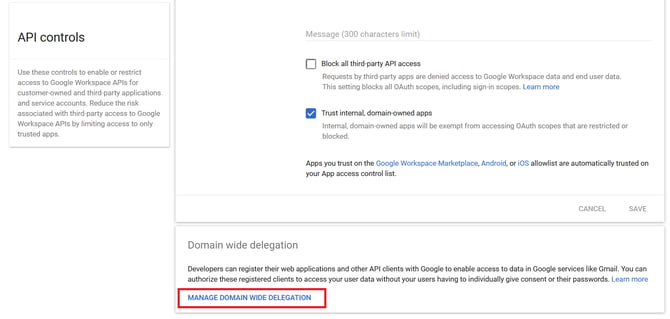
-
Under API Clients, Add a new client using your service account Client ID. Copy and paste the following strings into OAuth scopes, then press Authorize:
https://www.googleapis.com/auth/admin.directory.user.readonly, https://www.googleapis.com/auth/calendar, https://www.googleapis.com/auth/gmail.send, https://www.googleapis.com/auth/admin.directory.resource.calendar.readonly
Create & Configure Resource Calendars
-
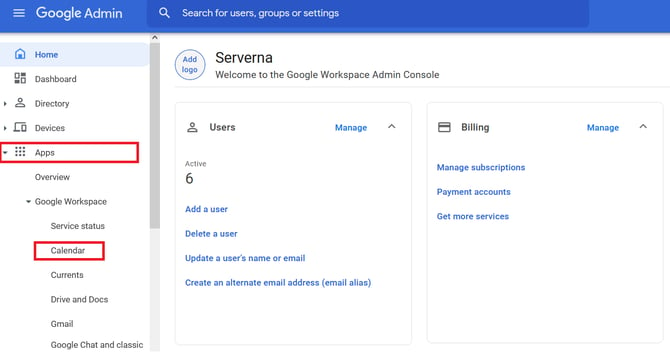
Navigate to admin.google.com. Select Apps and then Calendar.
-
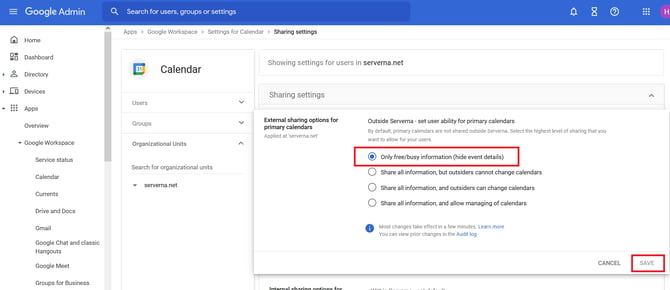
Select the External Sharing option, then set external sharing options for primary calendars to "Only free/busy information (hide event details)".

-
Create one or more calendar resources by navigating to Directory > Buildings and resources > Manage resources.
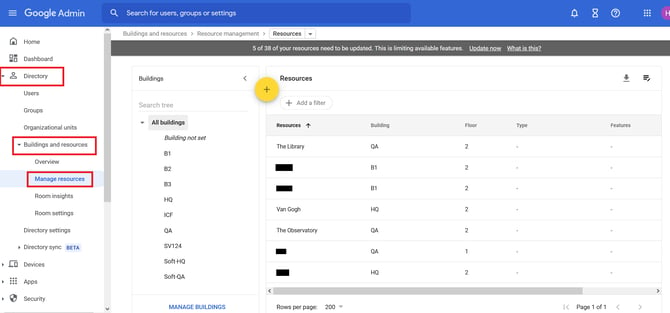
-
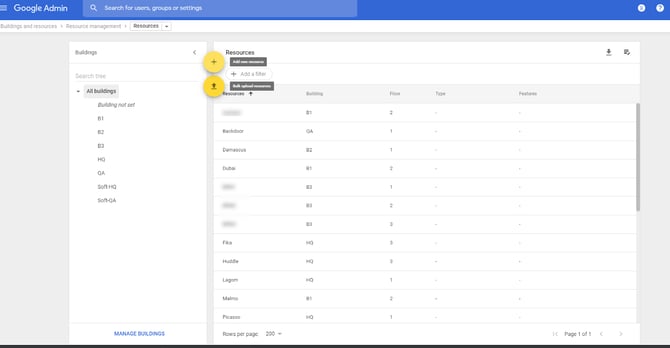
Click Create a new resource. Create a building first, then create rooms.
-
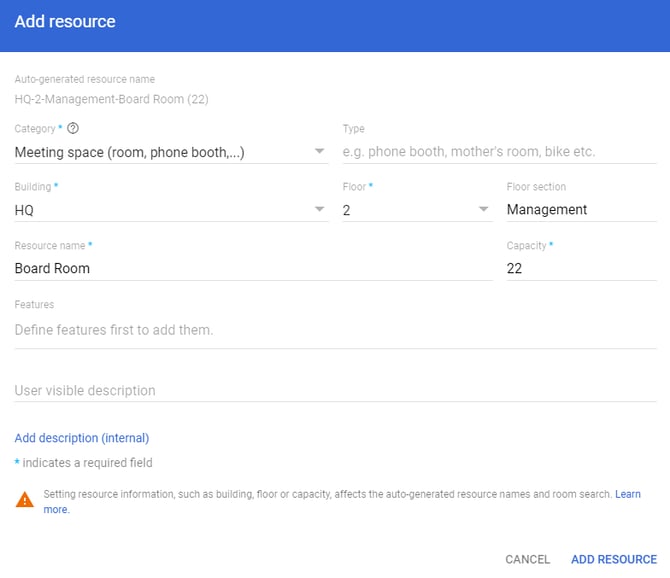
Add the details for your resource and click Add Resource.
- For a meeting room, the Type field must be set to Room (or room). Any other value will prevent Humly Control Panel from importing the resource.
- For a desk resource, set the type to desk.
- For a parking space, set the type to parking_space.
Grant Humly Admin User API Permissions
To connect HCP to your Google tenant, you will need a Humly Admin email — a dedicated user who will be authenticated from HCP to Google during the initial setup wizard and will act as Global Admin in HCP. API permissions are only needed for this user.
-
Go to Directory > Users and click on the user you want to use as the Humly Admin.
-
Scroll down and press Admin roles and privileges.

-
Apply the necessary API permissions by selecting one of the default Google roles: Super admin, Groups Admin, User Management Admin or Help Desk Admin. If you need a more restricted role, follow step 4–6 below to create a custom role.

-
To create a custom admin role, go to Account > Admin roles and press Create new role.

-
Give the role a name and click Next. Scroll down to Admin API privileges, select Read under Users. That is the only permission needed. Click Continue.

-
Apply the newly created admin role to your Humly Admin user.
Note: We strongly recommend creating a dedicated user specifically for Humly as the Admin email, rather than using a super admin account, to avoid potential issues in the future.
Grant Service Account and Humly Admin User Permissions to Resources
-
Go to Google Calendar. In the side menu next to Other calendars, press the + icon and browse for your newly created resource. Click the checkbox to add it.

-
Select the newly created resource calendar from My Calendar list, click the three-dot menu icon and select Settings and Sharing.

-
Scroll down to Share with specific people or groups and click Add people and groups.

-
Add the service account with the permission set to See only free/busy.
-
Add the Humly Admin user with the permission Make changes to events or Make changes and manage sharing.

-
Log in to Gmail with the Humly Admin account and accept the sharing invitation by adding the resource to your own calendar.

-
Repeat the previous steps for all resources in the project.
Note: It may take up to 72 hours for changes to be applied in Google Workspace. See also: Google's documentation on calendar sharing.
Important: The Humly Admin user must accept the shared resource by adding it to their own calendar (step 6 above). The resource will fail to import into Humly Control Panel otherwise.
You should now be able to proceed to step 2 – installing the Humly Control Panel.
- For on-premise installations: HCP Installation – Windows | HCP Installation – Linux
- For cloud accounts: HCP Installation – Cloud
Best Practices
- Use a dedicated Humly Admin account. Avoid using a personal super admin account as the Humly Admin email. A dedicated account makes it easier to manage permissions and avoids disruptions if the personal account changes.
- Use JSON keys for new setups on HCP 2.3+. P12 keys are not supported for new connections on HCP version 2.3 and later. Always create a JSON key for new setups.
- Store the service account key securely. The downloaded JSON (or P12) file is sensitive. Store it in a secure location and do not share it unnecessarily.
- Set resource types correctly from the start. Rooms must be typed as Room, desks as desk and parking spaces as parking_space. Incorrect types cannot be imported by HCP and require correction in Google Admin before retrying.
- Accept the calendar sharing invitation promptly. The Humly Admin user must accept the resource sharing invitation before HCP can import the resource. Without this acceptance the import will fail.
- Allow time for changes to propagate. Google Workspace changes can take up to 72 hours to fully apply. If the integration does not work immediately after setup, wait and retry before troubleshooting.
Troubleshooting
Resources do not appear in HCP during import
- Verify that the resource Type is set to exactly Room, desk or parking_space in Google Admin. Any other value will prevent HCP from recognising the resource.
- Confirm that the Humly Admin user has accepted the calendar sharing invitation and that the resource appears in their calendar.
- Check that the service account has been granted See only free/busy access to the resource calendar.
- Wait up to 72 hours after making changes in Google Workspace before retrying the import.
Authentication fails when connecting HCP to Google Workspace
- If you are on HCP 2.3 or later, ensure you are using a JSON key and not a P12 key. P12 keys are not supported for new connections on HCP 2.3+.
- Verify that the service account email and Client ID are correct and match what was created in Google Cloud Platform.
- Ensure that Domain Wide Delegation has been configured with all required OAuth scopes.
- Check that the service account has the Service Account Token Creator role assigned.
Bookings created in HCP do not appear in Google Calendar
- Confirm that the Humly Admin user has Make changes to events or Make changes and manage sharing permission on the resource calendar.
- Verify that the Gmail API and Google Calendar API are enabled in Google Cloud Platform for the project.
- Check that all required OAuth scopes are present under Domain Wide Delegation.
The service account key has expired or been revoked
- Go to IAM & Admin > Service Accounts in Google Cloud Platform, select the service account, click Keys and create a new key.
- For HCP 2.3 and later, create a JSON key. For older versions, create a P12 key.
- Update the key in HCP under Settings > Global Settings > Booking System.