This guide provides all necessary technical specifications and instructions for the installation of the Humly Booking Device. It is intended for authorized resellers, installers, and IT professionals.
This guide will cover:
- Package Content
- Optional Accessories
- Required Tools & Materials
- Technical Specifications & Dimensions
- Power & Connectivity
- Pre-Installation Planning
- Mounting Instructions for Desk
- Mounting Instructions for Wall
For connecting with desk control, please refer to any of these documentations:
Linak - https://support.humly.com/linak-desk-control
Jiecang - https://support.humly.com/jiecang-desk-control
Logicdata - https://support.humly.com/logicdata-desk-control
Technical specifications can be found over at: Humly Booking Device - Technical Specifications
Important: Read all safety instructions and this entire guide before beginning the installation.
Avoid mounting near heat sources or in direct sunlight and leave enough clearance for cable access and ventilation.
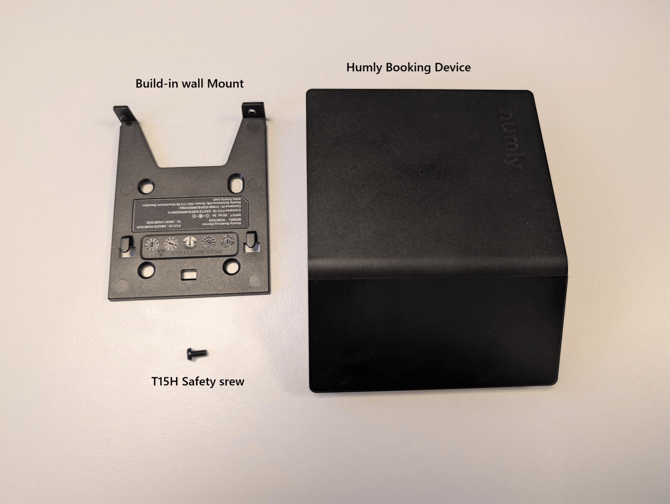
Package Contents
Verify all components are present before traveling to the installation site.
- Humly Booking Device
Article number: HUM1020 - Build-in wall mount
- 1x T15H Safety screw
Optional Accessories (Sold Separately)
- Desk Mount for Booking Device: Required for under desk installations
Article number: HUM1020925
Packet 5 in a box
They come along with double sided 3M sticker
-jpg.jpeg?width=335&height=252&name=Media%20(70)-jpg.jpeg)
-jpg.jpeg?width=335&height=252&name=Media%20(71)-jpg.jpeg)
-
Glass Mount Kit: Required for glass wall installations.
Article number: HUM1020955
Packet 5 in a bag
They come along with double sided 3M sticker
-jpg.jpeg?width=670&height=504&name=Media%20(69)-jpg.jpeg)
-
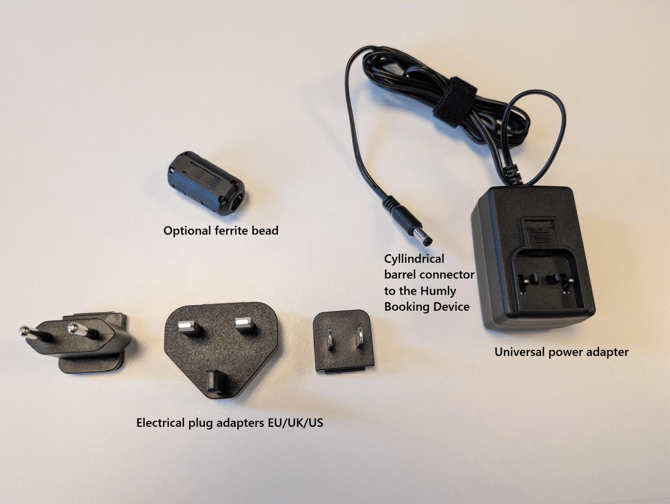
5V/3A Power Adapter EU/UK/US standard: Used if PoE is not available.
Article number: HUM1020915
Optional ferrite bead
The cable is 2 m (6.56 ft)
The ferrite on the cable is 2 cm (0.79 in) in diameter
For desk installations, the ferrite bead may remain on the cable when using the power adapter. For wall mounting, we recommend removing the ferrite bead to support a streamlined appearance and facilitate optimal cable management.
-
PoE and Desk Control for Booking Device: For use with PoE or desk control
Article number: HUM1020935
Packed 5 in a box
The cable is 2.5 meter (8.20 ft) long
They come along with double sided 3M sticker
Network cable is not supplied

- USB-C power cable for Booking Device: Requires USB-C power source of 3A
Article number: HUM1020975
Packed 1 in a bag
USB-C to power jack
The cable is 1.5 meter (4.92 ft) long
USB-C power adapter is not included

Required Tools & Materials (Not Included)
-
Screwdriver with T15H bit (for safety screw)
-
Drill with appropriate bits (for wall mounting)
-
2-4x Mounting Screws: Recommended: #7 or #8 (4-4.5mm) diameter, 35mm (1 3/8”) length. Type must be appropriate for the wall substrate (e.g., drywall, wood).
-
2-4x Wall Anchors: (If mounting to drywall or masonry)
-
Professional Level
-
Pencil or marker
-
Cleaning Supplies: Isopropyl alcohol (IPA) and a lint-free cloth (essential for adhesive mounts)
-
Ethernet Cable for PoE option: Cat 5e or better, cut to the required length for routing
Technical Specifications & Dimensions
This data is essential for pre-installation planning, including space and power requirements.
Product Dimensions
Mounting accessory for desk


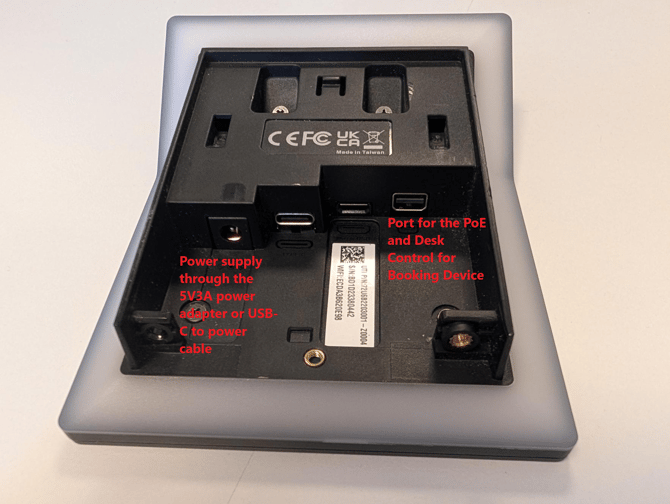
Power & Connectivity
-
Primary Power (Recommended):
-
Type: Power over Ethernet (PoE)
-
Standard: IEEE 802.3af
-
Class: PoE Class 2 (Max 6.49W)
-
Connector: Mini Display Port
-
-
Secondary Power (Optional):
-
Type: Power Adapter EU/UK/US standard
-
Specification: 5 Volts @ 3 Amps (5V/3A)
-
Connector: DC Barrel Connector, 5.0 mm (0.197 in) outer diameter (sleeve) / 10.0 mm (0.394 in) pin lenght
-
Adapter Cable Length: 2.0m (6.56 ft)
- There is a ferrite on the cable with a diameter of 2 cm (0.79 in)
-
Pre-Installation Planning
-
Mounting Height:
-
Standard Height: The common mounting height for general visibility is 1500 mm (5 ft) from the floor to the center of the device. This is based on the average standing eye level.
-
Accessible Height (ADA/DDA Compliant): To ensure compliance with accessibility standards, the highest interactive part of the device should be no more than 1220 mm (48 in) from the floor. This height is reachable from a wheelchair.
-
Always confirm the final mounting height with the building manager or client before installation. Local building codes and accessibility laws (like the ADA) take precedence over general recommendations.
-
Cable Routing: Plan the cable route.
-
For Desk Mounting: This is the simplest method. The device cable and any power accessories (like a PoE or 5V adapter) are hidden underneath the desk. The desk mount and accessories can be secured with adhesive or clips.
-
For Wall Mounting: The recommendation is to run the power cable (5V DC, USB-C or PoE) externally on the wall surface. This cable should be concealed using a cable cord (also known as a surface raceway or trunking) for a clean, professional finish. The Wall Mount Back Plate is designed to accept a cable from its edge.
-
-
Adhesive Surfaces (Critical): For desk or glass mounting, the surface must be flat, smooth, and non-porous. It must be cleaned with Isopropyl Alcohol and be completely dry. Do not use standard glass cleaner, which can leave residue.
Mounting Instructions for Desks (Under-Desk)
Options:
- On top of desk
- Under desk
1. Prepare Surface: Thoroughly clean the underside of the desk with isopropyl alcohol. Allow it to dry completely.
2. Insert Device: Slide the Humly Booking Device into the Desk Mount Kit until it is fully seated.
-jpg.jpeg?width=335&height=445&name=Media%20(55)-jpg.jpeg)
-jpg.jpeg?width=335&height=445&name=Media%20(54)-jpg.jpeg)
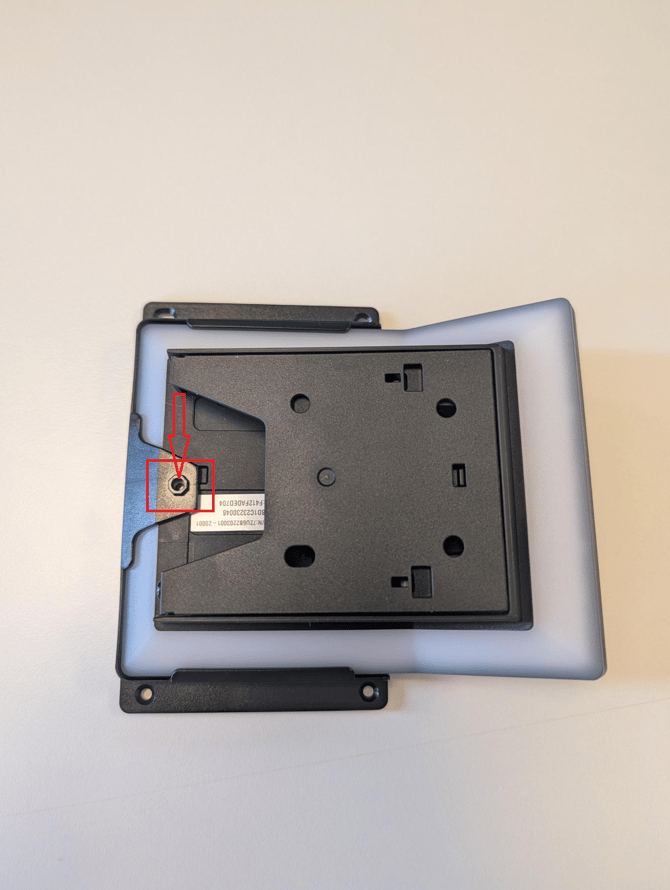
3. Secure Device: Insert the T15H safety screw into the designated hole on the mount and tighten gently. Do not overtighten.
4. Connect cable: Connect the Humly Booking Device to a power source by selecting either the 5V/3A power adapter or utilizing Power over Ethernet (PoE) with Desk Control, based on your installation preference.
-jpg-1.jpeg?width=670&height=890&name=Media%20(73)-jpg-1.jpeg)
5. Adhere Mount: Peel the protective film from the adhesive backing.
-jpg.jpeg?width=670&height=890&name=Media%20(51)-jpg.jpeg)
6. Position and Press: Position the mount under the desk (e.g., 1 cm / 0.4 inch from the edge). Press the entire mount firmly against the surface for at least 60 seconds.

-jpg.jpeg?width=670&height=890&name=Media%20(52)-jpg.jpeg)
Standard Wall Mounting
1. Separate Mount: Gently detach the Wall Mount Back Plate from the back of the device.
2. Position and Level: Place the back plate against the wall at the recommended height (1500 mm / 5 ft). Use a level to ensure it is horizontal.
-jpg.jpeg?width=670&height=890&name=Media%20(56)-jpg.jpeg)
3. Mark & Drill: Use a pencil to mark the 2 or 4 hole locations. Drill holes and insert wall anchors if required.
-jpg.jpeg?width=670&height=890&name=Media%20(57)-jpg.jpeg)
4. Mount Back Plate: Mount the back plate to the wall with the screws and route the cables through the appropriate channels on the device.
Use 2 – 4 screws depending on the structural capacity of the wall. Always drill holes and use suitable plugs for wall types such as concrete, plaster etc. Choose a screw type that is suitable for the type of plug and wall concerned. Use screws with a diameter of 4 – 5 mm / gauge # 7 - 10 and minimum length of 35 mm / 1- 3 /8 in. If uncertain, always contact a specialist or dealer for assistance with wall mounting.
Make sure not to tighten the screws too tight - the mount might bend. Also, do not remove the protective film on the back of the mounting bracket - the “sticky surface” should only be used for glass wall mounting.
-jpg.jpeg?width=670&height=890&name=Media%20(58)-jpg.jpeg)
5. Connect Cable: Connect the Ethernet (PoE) or 5V DC cable to the back of the Humly Booking Device.
-jpg.jpeg?width=670&height=890&name=Media%20(72)-jpg.jpeg)
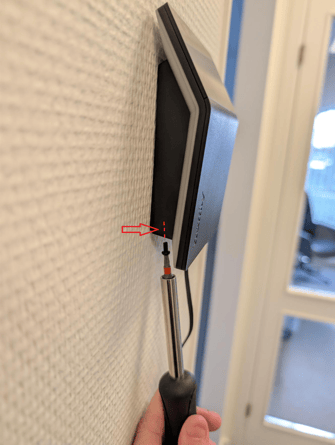
6. Attach Device: Align the device with the mounted back plate and slide it down until it clicks securely into place. Insert the T15H safety screw into the hole at the bottom (or side) and tighten gently to lock the device.
-jpg.jpeg?width=335&height=445&name=Media%20(74)-jpg.jpeg)
6. To ensure a seamless installation and maintain a clean appearance, consider using a cable management solution to conceal the power cable.
-jpg.jpeg?width=670&height=890&name=Media%20(76)-jpg.jpeg)
Power On & Next Steps
Once the device is mounted and connected to a live PoE port or 5V adapter, it will automatically power on. The display will show a welcome screen and you can now proceed with provisioning the device.
The physical installation is now complete
Software Configuration
To provision the device and connect it to your booking system, please refer to the: How to connect Humly Booking Device
For all documentation, visit: support.humly.com