
MQTT sensors publish their readings straight to the MQTT broker built into Humly Sensor Gateway (HSG). Each sensor gets its own login and its own topic. This article uses the Atlona AT-OCS-900N occupancy sensor as the example.
In this article
- Before you start
- Step 1: Create the sensor's MQTT login
- Step 2: Give the sensor a fixed address
- Step 3: Set up MQTT on the Atlona AT-OCS-900N
- Step 4: Choose when the sensor reports
- Step 5: Approve the sensor
- Change or remove a login
- If the sensor does not connect
Before you start
- HSG is set up and paired. See Humly Sensor Gateway - First-time setup.
- The sensor is on the network and can reach the HSG server on port 1883.
- You can sign in to the sensor's web page. On the Atlona AT-OCS-900N, open
https://<sensor-ip>in a browser.
Using another MQTT sensor?
Tell us about it. Email support@humly.com with the brand, the model and whether it uses LoRaWAN or MQTT. Most LoRaWAN sensors work without changes. For other MQTT sensors, we can add support in an HSG update.
Step 1: Create the sensor's MQTT login
- In the HSG dashboard, go to Settings.
- Under MQTT sensor credentials, select the vendor, for example atlona.
- Click + Mint credentials.
- Copy the Username, Password and Topic prefix. HSG shows the password only once.
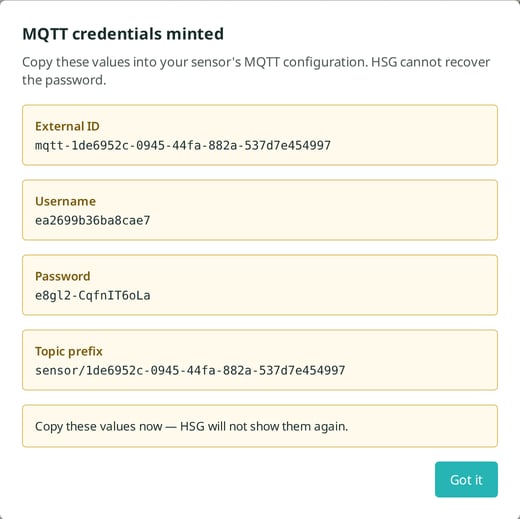
Create one login per sensor. The username and password are 16 characters long. That is the most the Atlona AT-OCS-900N accepts.
Step 2: Give the sensor a fixed address
A sensor that loses its network address stops sending data. Give it a stable address in one of two ways:
- Keep Enable DHCP on, and add a DHCP reservation for the sensor's MAC address in your DHCP server. This is the easiest option.
- Or turn Enable DHCP off and enter a fixed IP address, gateway, subnet mask and DNS server.
On the Atlona AT-OCS-900N, these settings are under Network. The page also shows the MAC address and has a Restart Device button.
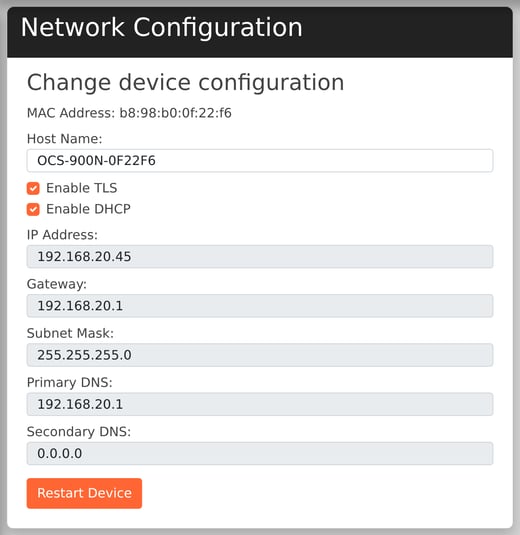
Give the HSG server a fixed address as well. Every MQTT sensor points at it.
Step 3: Set up MQTT on the Atlona AT-OCS-900N
Go to Protocols and scroll to MQTT Client. Fill in the settings below, then click Save.
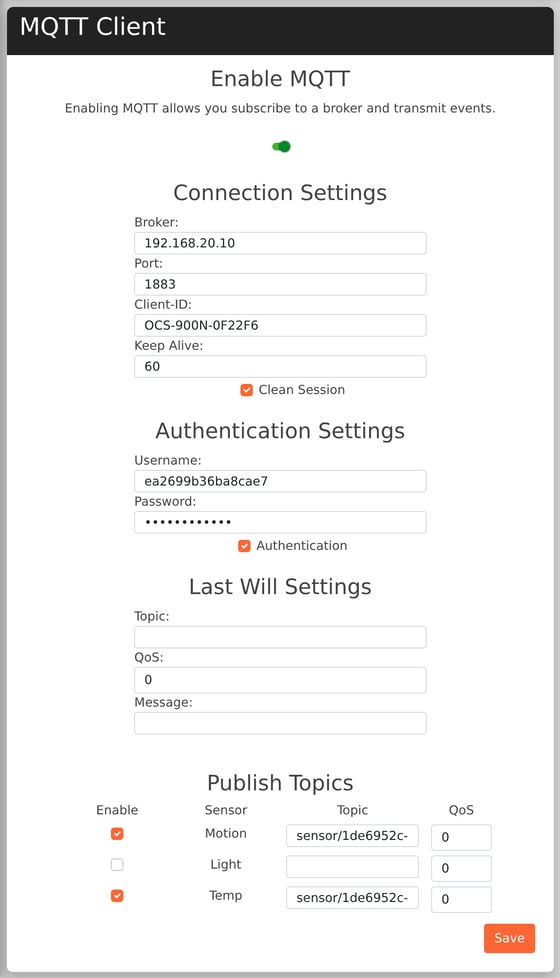
| Setting | Value |
|---|---|
| Enable MQTT | On |
| Broker | The HSG server's IP address or host name |
| Port | 1883 |
| Client-ID | Keep the default, for example OCS-900N-0F22F6 |
| Keep Alive | 60 |
| Clean Session | Ticked |
| Username / Password | From step 1 |
| Authentication | Ticked |
| Last Will Settings | Leave empty |
| Publish topic, Motion | Enabled. <topic prefix>/motion. QoS 0. |
| Publish topic, Light | Disabled. HSG does not use light readings. |
| Publish topic, Temp | Enabled. <topic prefix>/temperature. QoS 0. |
For example, with the topic prefix sensor/1de6952c-0945-44fa-882a-537d7e454997, the motion topic is sensor/1de6952c-0945-44fa-882a-537d7e454997/motion. The topic must start with the exact prefix from step 1.
After you save, restart the sensor with Network > Restart Device. It then connects with the new settings.
Good to know
The same page has UDP, TCP and WebSocket settings. Those serve other systems, such as AV control. MQTT works alongside them, so you can leave them as they are.
Step 4: Choose when the sensor reports
The Atlona AT-OCS-900N only reports when something changes. Two settings under Sensors decide how quickly Humly sees a change.
Motion Sensor
- Motion On Event: seconds of continuous motion before the sensor reports motion.
- Motion Off Event: minutes without motion before the sensor reports that the room is empty.
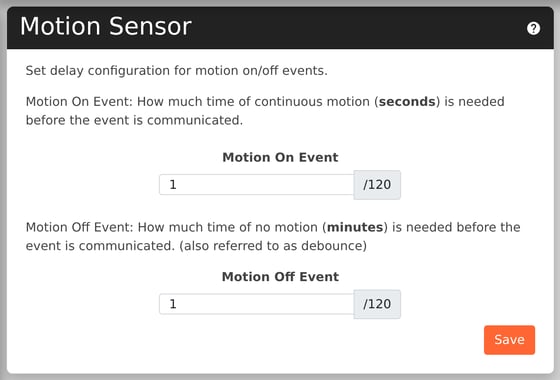
A short Motion Off time frees a room quickly. A longer time avoids marking a room as empty when people sit still.
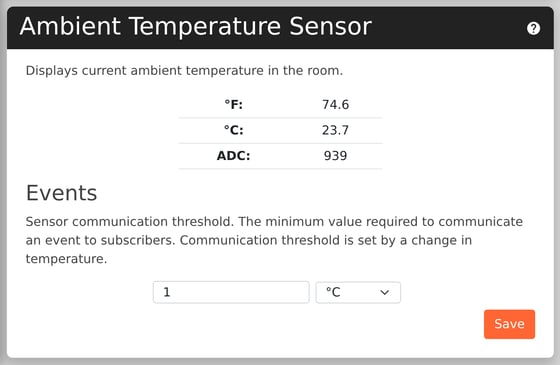
Ambient Temperature Sensor
- The Events threshold is the temperature change that triggers a new reading. With
1°C, the sensor reports only when the temperature moves by a full degree. - Lower the threshold, for example to
0.5, for more frequent temperature updates. - Keep the unit set to °C.
Step 5: Approve the sensor
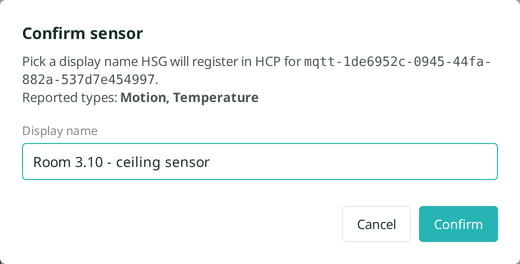
The sensor appears on the HSG Sensors page as Pending. Until it sends its first reading, it shows awaiting first publish. Walk under the sensor to trigger a motion reading.
- Click Confirm on the sensor.
- Enter a display name, for example the room name. Click Confirm.
- Assign the sensor to a resource in Humly Control Panel.
Good to know
Because the sensor only reports changes, a reading can be hours old in a quiet room. That is normal.
Change or remove a login
- New password: On the Sensors page, use Regenerate password on the sensor. The username and topic stay the same. Enter the new password in the sensor and restart it.
- Remove a sensor: Use Delete on the sensor. This also removes its MQTT login and unregisters it from Humly Control Panel.
If the sensor does not connect
- The Logs page shows "not authorised" for the sensor. The username or password is wrong. Regenerate the password and enter it again.
- The Logs page shows nothing from the sensor. Check that Enable MQTT is on and the broker address is right. Check that the sensor has a network address and can reach port 1883.
- The sensor connects, but no sensor appears in HSG. The topic does not start with the topic prefix from step 1. Look for "unknown sensor" warnings on the Logs page.
MQTT traffic is not encrypted. Keep MQTT sensors and HSG on a trusted network.
More help: Humly Sensor Gateway - Troubleshooting.
Humly Sensor Gateway guide
Get started
- Humly Sensor Gateway - Overview
- Humly Sensor Gateway - Use cases
- Humly Sensor Gateway - Requirements
Install and set up
- Install Humly Sensor Gateway on Windows
- Install Humly Sensor Gateway on Linux
- Humly Sensor Gateway - First-time setup
Connect sensors
- Connect LoRaWAN sensors to Humly Sensor Gateway
- Connect ChirpStack to Humly Sensor Gateway
- Connect The Things Stack to Humly Sensor Gateway
- Connect MQTT sensors to Humly Sensor Gateway
Manage and troubleshoot