
This article takes you from a fresh installation to a gateway that is paired with Humly Control Panel. It takes about 15 minutes. You prepare Humly Control Panel first, then set up HSG in its dashboard.
In this article
- Before you start
- Step 1: Prepare Humly Control Panel
- Step 2: Find the setup token
- Step 3: Create the admin account
- Step 4: Pair with Humly Control Panel
- Step 5: Turn on two-factor authentication
- Optional: Serve the dashboard over HTTPS
- Next steps
Before you start
- HSG is installed on a Windows or Linux server. See Install Humly Sensor Gateway on Windows or Install Humly Sensor Gateway on Linux.
- You can sign in to Humly Control Panel as an administrator.
- You have a Humly Sensor Gateway licence file.
- Your computer can reach the HSG server on port 3100.
Tip
The Windows and Linux installers can create the admin account and the pairing for you. If you entered those details during installation, sign in and go straight to step 5.
Step 1: Prepare Humly Control Panel
HSG sends readings to Humly Control Panel through an integration user. Humly Control Panel only accepts the readings when the licence and the integration are both active.
- Go to Settings > Licenses and add your Humly Sensor Gateway licence.
- Go to Settings > Sensor integration and turn on Humly Sensor Gateway.
- Go to Users and add a user with the API Integration role. Write down the username and password. HSG uses them in step 4.
Note
Add the licence before you turn on the integration. Without a valid licence, Humly Control Panel turns the integration off again.
Step 2: Find the setup token
HSG prints a one-time setup token when it starts and no admin account exists yet. The token proves that you have access to the server.
| Server | Where to find the token |
|---|---|
| Linux | Run sudo journalctl -u humly-hsg and look for the line about the setup token. |
| Windows | Open C:\ProgramData\Humly\SensorGateway\logs\HsgService.log. |
A restart creates a new token. Always use the most recent one.
Step 3: Create the admin account
- Open
http://<hsg-server>:3100in a browser. - Paste the setup token.
- Choose an admin username. Use 3 to 64 characters: letters, digits, and
. _ @ -. - Choose a password. Use 12 to 64 characters, with an uppercase letter, a lowercase letter and one of these characters:
@ ! # $ % ' ( ) = ? / + * , . - - Click Create admin & continue.
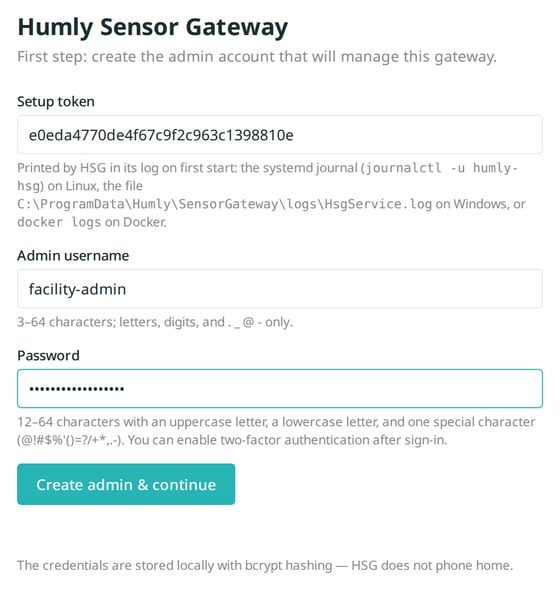
Important
Store the admin password safely, for example in your password manager. HSG has no self-service password reset yet.
Step 4: Pair with Humly Control Panel
- Enter the HCP URL, for example
https://humly.example.com. - Enter the username and password of the integration user from step 1.
- Click Pair with HCP.
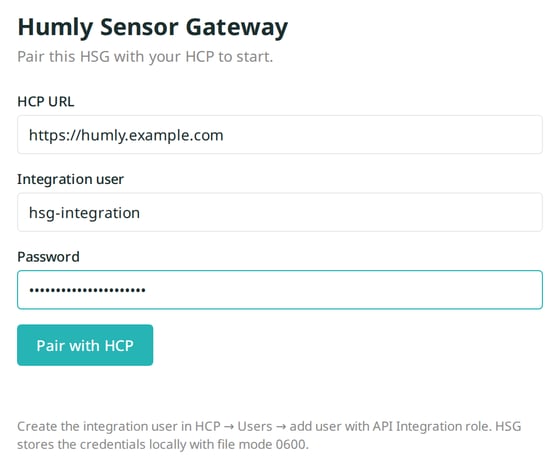
HSG signs in to Humly Control Panel to check the details. When pairing succeeds, the dashboard opens on the Sensors page. The top right shows Paired with HCP and the address.
If pairing fails: Check that the HSG server can reach the HCP URL over HTTPS. Then check the integration user's username, password and role.
Step 5: Turn on two-factor authentication
We recommend two-factor authentication for every gateway. The dashboard controls pairing and sensor access, so protect it like any other admin tool.
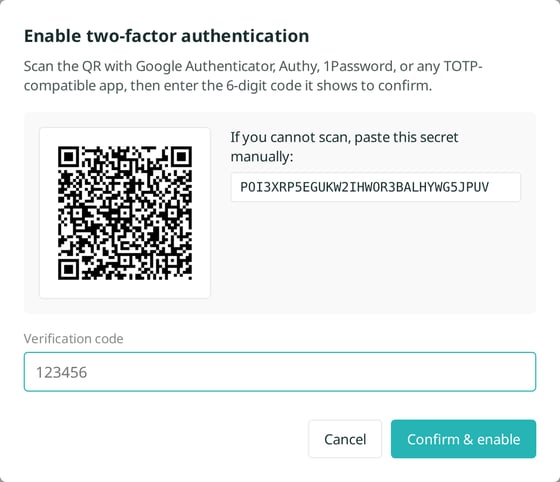
- Go to Settings. Under Security, click Enable two-factor authentication.
- Scan the QR code with an authenticator app, such as Google Authenticator, Microsoft Authenticator or 1Password.
- Enter the 6-digit code from the app and click Confirm & enable.
- HSG shows one recovery code. Store it safely. It works once, if you lose access to your authenticator app.
Optional: Serve the dashboard over HTTPS
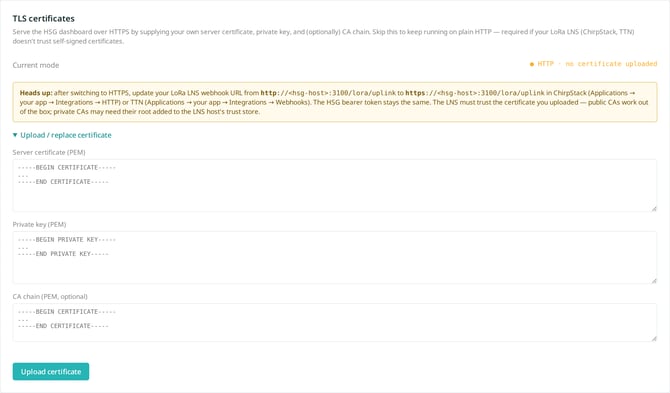
By default the dashboard runs over HTTP on your local network. To use HTTPS, upload your own certificate under Settings > TLS certificates. HSG switches to HTTPS without a restart.
Important
After the switch, change your network server's webhook address from http:// to https://. The network server must trust your certificate. Certificates from public certificate authorities work without changes. A private certificate authority may need to be added to the network server's trust store.
Next steps
Humly Sensor Gateway guide
Get started
- Humly Sensor Gateway - Overview
- Humly Sensor Gateway - Use cases
- Humly Sensor Gateway - Requirements
Install and set up
- Install Humly Sensor Gateway on Windows
- Install Humly Sensor Gateway on Linux
- Humly Sensor Gateway - First-time setup
Connect sensors
- Connect LoRaWAN sensors to Humly Sensor Gateway
- Connect ChirpStack to Humly Sensor Gateway
- Connect The Things Stack to Humly Sensor Gateway
- Connect MQTT sensors to Humly Sensor Gateway
Manage and troubleshoot